Sky Replacement Software Comparison
INTRO
This analysis focuses on four of the most popular stand-alone applications that include sky replacement functions.
– Anthropics LandscapePro, which is a dedicated application that uses AI processing for adjusting landscape photographs.
– Skylum Luminar AI, another stand-alone application but with a more general-purpose toolset that is also AI-based.
– ON1 Photo RAW 2022.1, another general-purpose editor with raw file processing as well as cataloguing and effects filters and presets that include sky replacement.
– Adobe Photoshop CC, the leading professional image editor, which gained sky replacement in V. 22, released in October 2020.
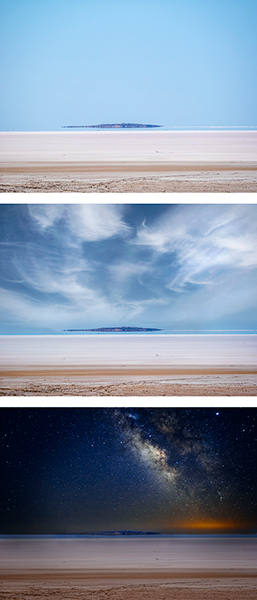
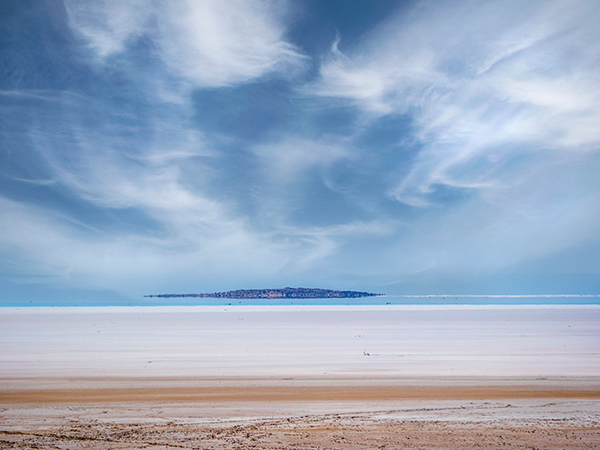
This illustration shows some of the sky replacement options available in today’s image editors. The top image is the original, unedited file.
How it works
All sky replacement software works in the same way: the application identifies the sky on the basis of hue and tone then selects it to create an editable layer. The user then clicks on a suitable sky image from a dropdown menu. The software replaces the editable layer with the selected sky image.
Most applications provide sliders for adjusting the position of the replacement sky, both horizontally and vertically. Some also allow it to be magnified, reduced and/or flipped horizontally. The opacity of the lower edge of the replacement sky is usually adjustable with a Fade slider to make it blend better into the rest of the picture.
Exposure levels, colour and contrast are often adjustable and some apps include a Dehaze filter. A few include lighting adjustments that allow users to change the perceived direction of the light and some provide before/after views so users can see the effects of the changes directly before committing to them.
In this analysis we’ll look at who each one is best suited to, consider the range of adjustments provided by each application, how easy they are to use and how successfully they can be implemented. We’ll also look at the diversity of the built-in substitute skies and whether the application allows users to add their own sky images to the selection.
It’s worth noting that many of the pre-loaded skies may be unsuitable for use with images recorded in Australian conditions, particularly in the outback. The ability to import the user’s own sky images is, therefore, an important feature for those of us who live in the Southern Hemisphere, where skies are clear more frequently than north of the equator.
Our tests
The four stand-alone applications are all available for Windows and Mac OS computers. All can be used with JPEG and TIFF files but not necessarily raw files. Three of the four can function as plug-ins for Photoshop and Photoshop Elements, while the fourth is a function in recent editions of Photoshop.
LandscapePro 3
Back in November 2017 we reviewed LandscapePro 2, the second-generation application from Anthropics dedicated to landscape enhancement. This was our first introduction to sky replacement and we found it had a few in-built problems, despite being relatively easy to use.
LandscapePro 3 has since been released with a new collection of sky choices, an ‘Atmosphere’ slider for adding effects like rain, fog and lens flare and a Clone brush for removing unwanted objects that intrude on sky-lines. As with Version 2, when used as a plug-in in Adobe’s Photoshop, Photoshop Elements and Lightroom, it transfers the interface from Photoshop to LandscapePro 3.
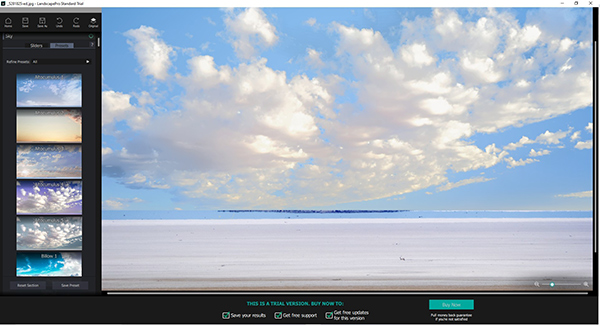
The panel on the left shows some examples of replacement skies in LandscapePro 3.
While LandscapePro 3 can read and write JPEG and TIFF files (including 16-bit TIFFs) and includes embedded colour profile support, its capabilities are fairly limited when compared with the other three applications. Raw file support is only available in the Studio and Studio Max editions.
We found the user interface in version 3 hasn’t changed much. It is still vital to ensure each area’s boundaries are clearly selected. The new version also still suffers from many of the issues we identified in version 2.
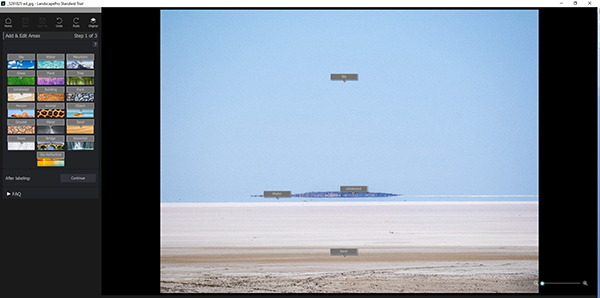
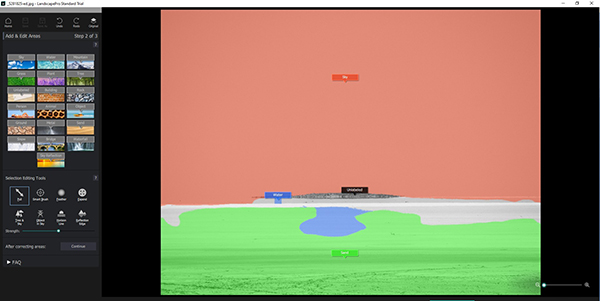
The top screen grab shows the opening interface, which requires the user to separately identify different sections of the picture. Clicking on the Continue tab shows how these selections are separately masked (lower screen grab). The brush control in the tool panel on the left lets you extend the coverage of a selection mask.
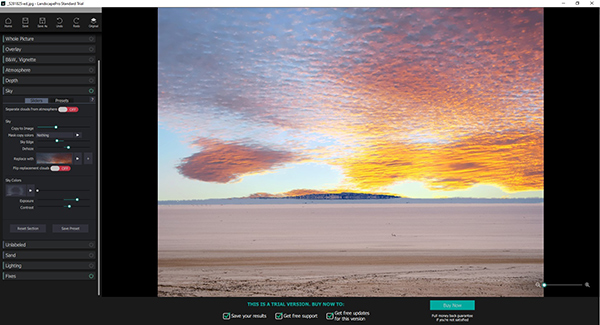
With more than 150 selectable skies in the built-in library, there’s no shortage of sky replacement options. But we found too many of them were unsuitable for use with our test image. Users can also import their own sky images.
Unfortunately, user interface remains a bit clunky and the program still doesn’t provide an adequate range of tweaking adjustments. Furthermore, the end results will only be acceptable if the original masking was well-defined.
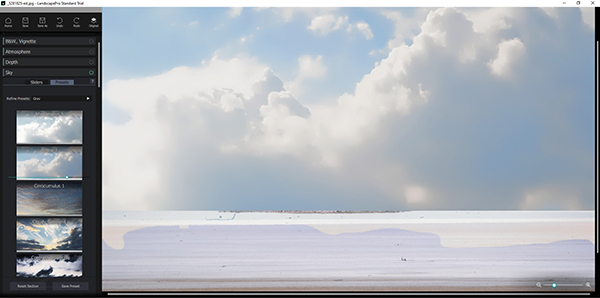
This example shows what happens when the different sections of the image are not correctly and accurately masked. The sky image is also a poor match for the foreground.
Some modifications can be made to the lighting with the Lighting slider, as shown in the screen grabs below. But ensuring the lighting matches the rest of the scene can be more challenging than you think at times.
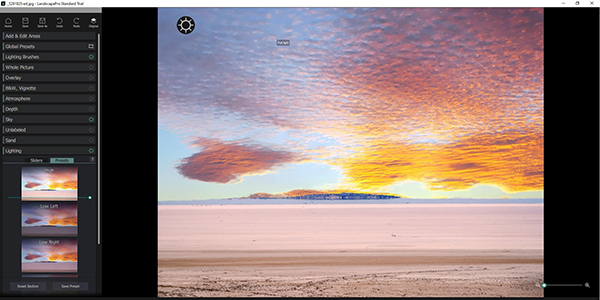
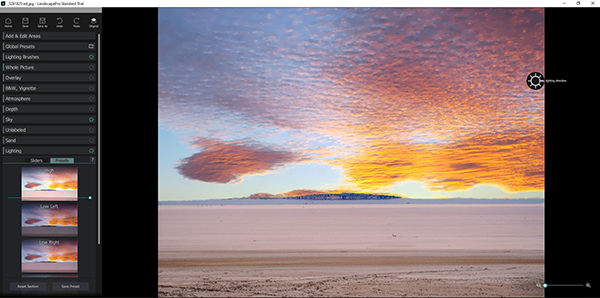
These three illustrations show the use of the Lighting tool to reposition the light source to the top left corner in the second screen grab and the right side in the bottom screen grab.
Although this application can be fun to ‘play with’, it provides a limited range of adjustments for parameters like colour selection, brightness, contrast and saturation. Users will also need to be careful in their selection of replacement skies since most of the possible replacements were shot the Northern Hemisphere where this software originates.
LandscapePro 3 was priced at AU$99.90 (RRP) but was reduced to AU$49.95 at the time of publication. A trial download can be found on the Anthropics website.
Best for: Novice users who are prepared to spend time figuring out the slightly quirky user interface.
Performance: OK at what it does but limited.
Value for money: Good at discounted price; otherwise a bit pricey for what’s provided.
Luminar AI
While it’s also ‘powered by artificial intelligence’, Skylum Luminar AI is a more sophisticated application than LandscapePro and provides a wider range of adjustments – including plenty of automatic edits for novice users. Like LandscapePro, it can be used as a stand-alone application or a plug-in for Photoshop and Lightroom.
Luminar AI bases its user interface on templates; when you open an image you’re presented with a selection of templates to choose from. Sky replacement is located in the Tools dropdown menu, which opens when you click on the Edit tab on the top panel.
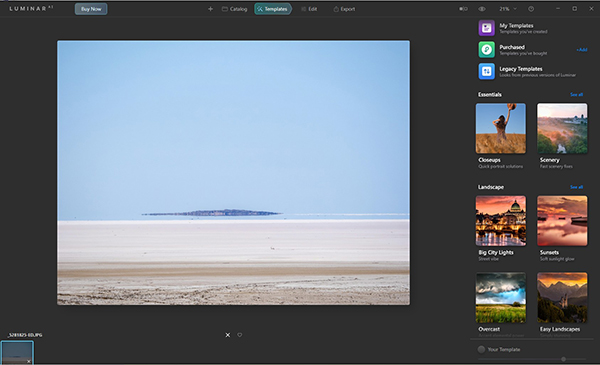
Luminar AI is template-based.
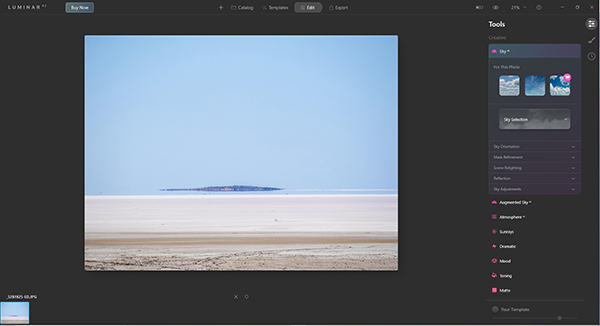
The Tools panel in Luminar AI.
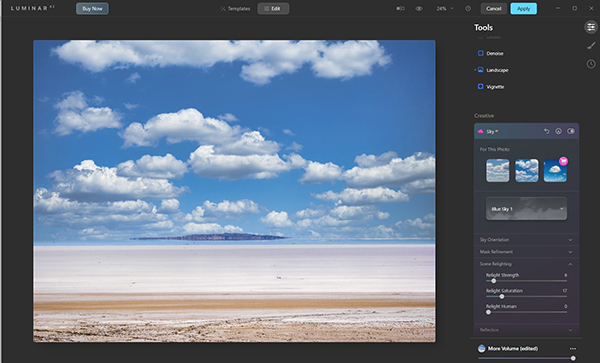
Luminar AI provides plenty of adjustment tools for tweaking sharpness, suppressing colour and luminosity noise, haze reduction and enhancement of foliage. Users can also impart a subtle ‘Golden Hour’ glow to a landscape.
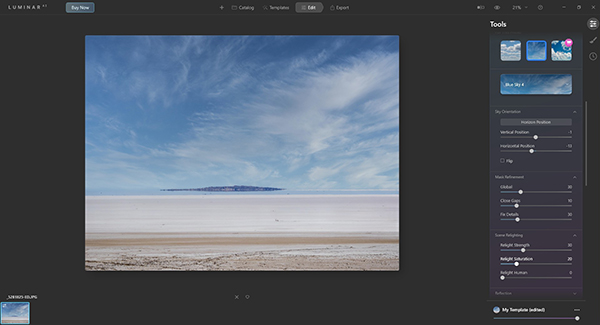
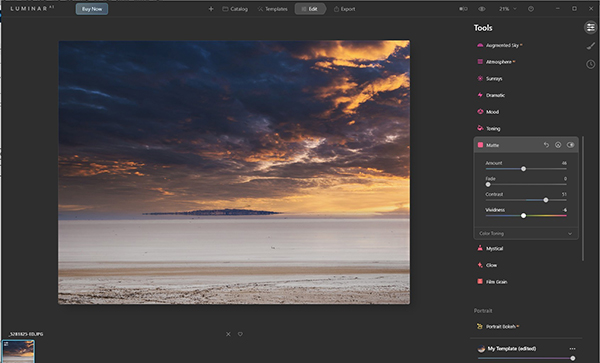
The sky replacement options are quite impressive with a ‘Creative’ menu containing Sky, Augmented Sky, Atmosphere, Sunrays, Dramatic, Mood, Toning, Matte, Mystical, Glow and Film Grain settings. Each of these settings has its own sub-menu for adjusting the Amount applied and tweaking factors like contrast and vividness.
Some examples of the results that can be produced are shown in the screen grabs below.


Four examples of some of the sky replacement options provided in Luminar AI.
Where the skies in the built-in library aren’t suitable, Luminar AI gives users the chance to import their own sky images – but only in JPEG format with a minimum resolution of 1200 pixels on the short edge of the frame. File sizes up to 10MB are preferred for ‘optimal performance’. Detailed instructions can be found on the Luminar website.
The History tab in the right toolbar lets you track back through all the edits you’ve tried. Before and after views are available for checking the impact of the changes you’ve made.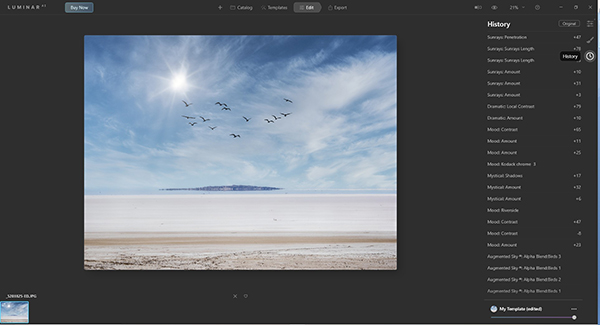
The History tab provides a useful list of all the operations previously selected for the image.
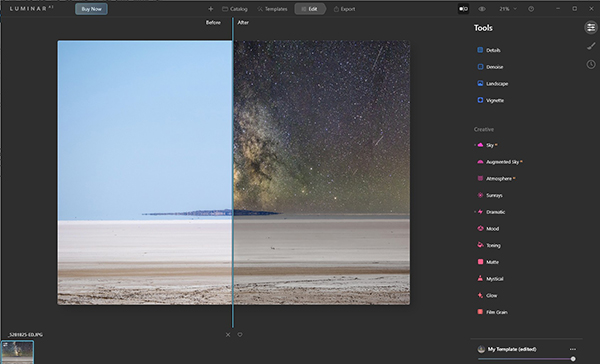
Before and after views can be used to see the effects of the new sky selection.
On the whole, Luminar AI does a good job with sky replacement. It’s easy enough for relative novices in image editing and includes support for the most popular file formats (including PNG, PDF and Photoshop) as well as the sRGB, Adobe RGB and ProPhoto RGB colour spaces. It is also efficient for exporting files with options to export to disk, mail, SmugMug or the 500px sharing site.
Howeve, there are no facilities for colour management and no options for adding borders or templates for printing multiple images per page. It’s not so good with cataloguing collections of images for searching or sorting by keywords or folders.
When selected as a plug-in in Photoshop, users are taken back to the Luminar AI workspace.
The Photoshop plug-in is located in the Filter dropdown menu and when it’s clicked on, Luminar AI behaves much like LandscapePro and simply returns the user to the Luminar user space. At the time of publication a single licence for Luminar AI cost AU$64. Trial downloads are available on the Luminar website and you have 30 days for cost-free use in which to decide whether this software is what you want.
Best for: Mid-level users who want quick solutions to complex problems.
Performance: Less limited and slightly more effective than LandscapePro.
Value for money: Good.
ON1 Photo RAW
ON1 Photo RAW 2022.1 is another general-purpose editor with sky replacement, although it’s pitched at a higher level than Luminar AI and less reliant on AI processing. This application is essentially an all-in-one editor that includes image cataloguing and browsing, raw processing, masking capabilities, a comprehensive suite of image adjustments and a generous library of filters and effects pre-sets.
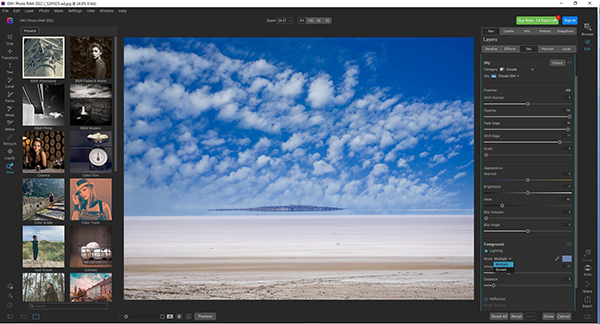
The user interface in ON1 Photo RAW shows the other editing modes in the left side panel.
The Sky Swap AI function in the latest version provides a comprehensive library of more than 100 skies to choose from. These are split into discrete categories, such as Clouds, Sunsets, Night Skies, Aurora Borealis and Storms. Users can also import their own sky images to add to the library.
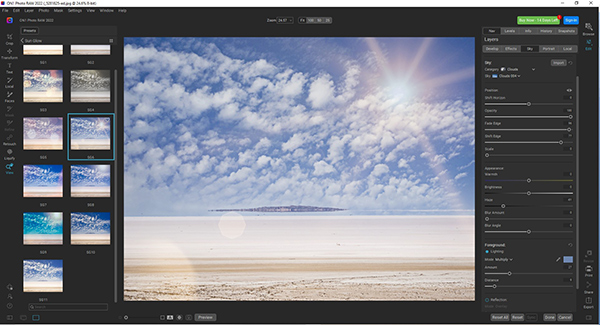
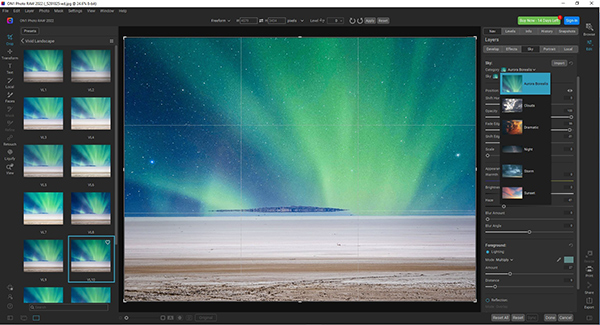
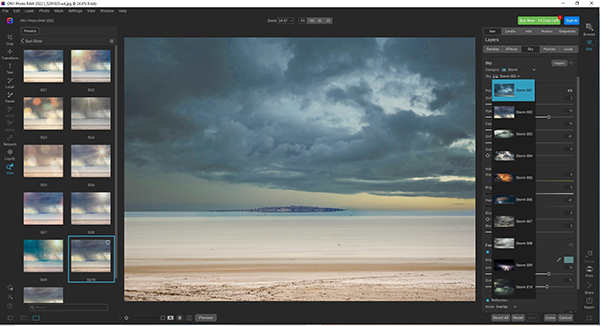
Some of the many presets are shown in the three screen grabs above. Note the various options displayed in the left side panel – an alternative way to provide fine-tuning adjustments.
The user interface displays a range of pre-sets for each of the sky replacements as they are selected, making it easy to see the effects of various fine adjustments to parameters like colour, contrast, saturation and lighting. Users are also able to shift the horizon, adjust the opacity of the replacement, fade its edge and introduce blur to simulate a long exposure. Haze reduction is also available and reflections of the sky can be added to landscapes with water in the foreground.
We found the masking to be somewhat hit-and-miss and very dependent on the user’s ability to adjust the parameters that control the position and opacity of the horizon. In addition, whereas Landscape Pro 3 (and, to a lesser extent, Luminar AI) made some attempt to adapt the foreground to the changed sky, ON1 Photo RAW made few or no adjustments. The replacement skies were also from the Northern Hemisphere (the Aurora Borealis tab bieng a give-away) and often unsuitable for use with images captured in Australia.
ON1 Photo RAW 2022.1 was priced at AU$159.36 when this review was published, making it more expensive than the other two applications. It’s also available as a subscription with 200GB of cloud storage included for AU$143.42 annually. Go to the ON1 Photo RAW website for full details.
Best for: Mid-level to basic enthusiast-level users who are happy with the limited controls provided by AI-based software.
Performance: A cut above Luminar AI as a general editor and slightly better at sky replacement
Value for money: A bit pricey for sky replacement alone but good value if other editing capabilities are taken into account.
Photoshop CC
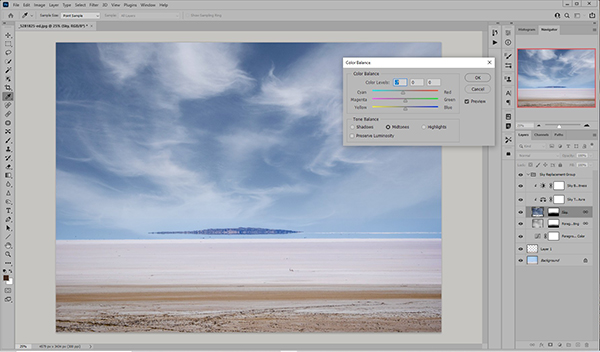
Adobe Photoshop CC gained a dedicated Sky Replacement tool in its October 2020 update.
It’s straightforward to use: you simply open the image you want to work on and select Edit > Sky Replacement. Then choose a suitable sky from the dropdown menu in the dialog box, as shown in the illustration on this page.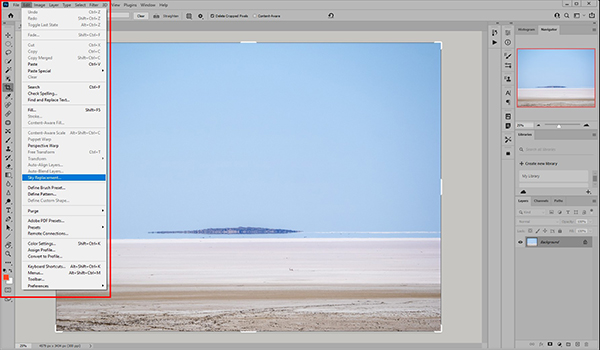
Using the Sky Replacement tool in Photoshop CC.
Once the user has selected the sky in the Sky Replacement dialog box, an additional menu pops up with of sliders for shifting and/or fading the edge and adjusting the sky’s Brightness, Temperature and Scale plus a button for flipping the sky horizontally. Users can also choose between Screen and Multiply for the Lighting Mode and adjust the lighting intensity and colour.
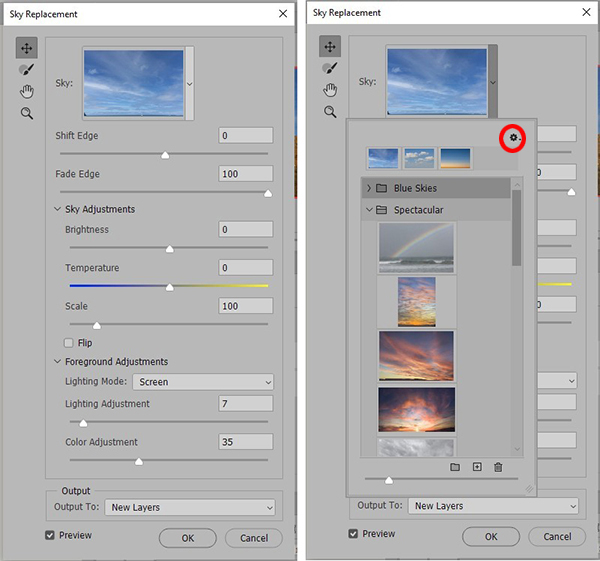
The two toolbars in the Sky Replacement function in Photoshop. Clicking on the button circled in red in the right side toolbar links to a menu that allows additional skies to be accessed.
The built-in library of sky presets is much smaller in Photoshop than those provided in the other three applications we’ve looked at. However, users are able to import more skies by clicking on a button in the top right corner of the dialog box, which links to a ‘fly out’ menu (outlined in red in the screen grab below).
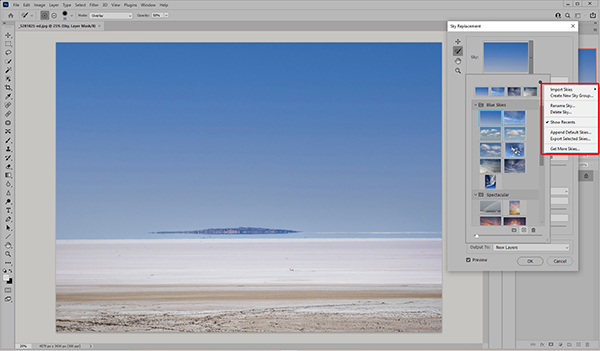
Import Skies accesses the user’s own image files, located via a browser. Sky Presets is used for importing existing presets in Photoshop into the collection.
Users can also create a new Sky Group for storing samples of skies they prefer working with or click on Get More Skies at the bottom of the menu. This links to the Adobe Discover website, where they can view and download additional images – including night skies and dramatic storms – free of charge.
The menu also contains tabs for renaming and deleting sky files, showing a list of recently accessed files, appending existing sky lists and exporting selected skies for use in other situations. Full details are provided in Photoshop’s Help menu.
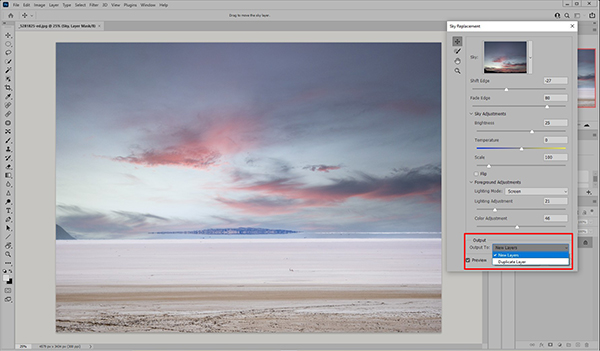
The Photoshop output options.
When the required adjustments have been made, a dialog box below the thumbnails allows the resulting image to be output as multiple layers (covering all key adjustments) or a single ‘duplicate’ layer. Like ON1 Photo RAW, the Photoshop function made no noticeable adjustments to the foreground to match the tones on the replacement skies, although such adjustments are possible when the image is output as multiple layers.
The creation of adjustable layers as part of the Sky Replacement process puts Photoshop ahead of the other applications as the best option for serious users.
The ability to output the image as multiple layers gives Photoshop an advantage over the other applications because it enables users to edit individual layers and take advantage of a much wider and more powerful suite of adjustment tools. When you can modify individual layers – including the layers generated from the replacement skies – you have a much better chance of matching the lighting of scene to the new sky and achieving more natural-looking results.
An example showing the result of selective editing of layers in Photoshop.
Photoshop is available only on a subscription basis with two main options: the Photography suite consisting of Lightroom on desktop and mobile, Lightroom Classic for desktop and Photoshop for desktop and iPad plus 20GB of cloud storage for AU$14.29 per month or Photoshop on desktop and mobile plus Adobe Fresco (a drawing and painting app) and 100GB of cloud storage at a price of AU$29.99 per month.
Best for: High-end users who are familiar with common editing tools and prepared to spend time on projects.
Performance: The most powerful application for users to take advantage of multiple layers output.
Value for money: The subscription model makes Photoshop a very expensive application for casual users and anyone who doesn’t make use of its extensive capabilities.
Footnote: Sky replacement, based on Adobe’s AI technology, Adobe Sensei, was introduced into Photoshop Elements in the 2021 edition as one of the Guided Edits. The Perfect Landscape function that supports sky replacement is highly automated, with a wizard-based interface that contains tools for replacing skies, removing haze, and erasing unwanted objects. Outside of those adjustments users have little control over the end results.