Epson EcoTank ET-8500
In summary
We can enthusiastically support EcoTank printers for normal office/home use, but it’s difficult to recommend the ET-8500 to photographers/photo enthusiasts. It can certainly produce photo prints that non-specialists might deem ‘acceptable’ on the range of media we tested (glossy, semi-gloss and matte papers), but when you compare photo prints from the ET-8500 with prints from a dedicated photo printer, the differences are obvious in both colour and tonal reproduction.
Full review
Epson was boasting its environmental commitments late in May 2021 at the Australian launch of its new EcoTank printers, which included the ‘photo capable’ ET-8500 and ET-8550 models. But there’s still a way to go if we want truly photo-capable EcoTank printers. While the ET-8500 and ET-8550 are a step in the right direction and will help to address the growing issue of plastics pollution, their RRPs are too high for the average consumer and their limited ink sets and profiling support restricts their value for photographers and photo enthusiasts.
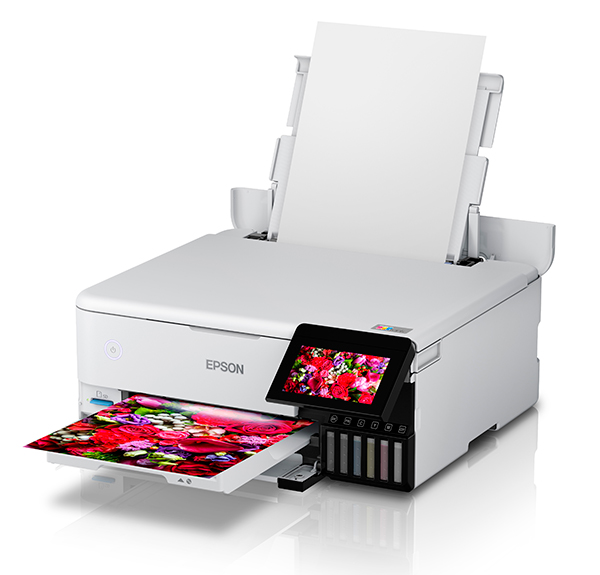
Angled view of the ET-8500 printer. (Source: Epson.)
Epson produced its first EcoTank printers back in 2015, with a four-model line-up headed by the ET-4550, which we reviewed in October of that year. Australia was late to the party; Epson’s Singapore website listed 18 models: four single-function printers (one of them A3+ size), 11 multi-function printers and three photo printers (one of them A3+ size with six ink tanks.
We reviewed the first five-ink models, the ET-7750 A3 printer in December 2017 and the ET-7700 A4 model in June 2020. But, again, they used the basic CMYK (cyan, magenta, yellow, black) dye ink set and simply added a pigment black ink for document printing.
The company has just released its first six-ink models in Australia but, once again, we’ve missed out on the ‘true’ photo ink set. Adding a grey ink to the basic CMYK set puts the ET-8500 and ET-8550 a small step above the five-ink models and a larger step above Canon’s four-ink MegaTank printers.
But we’re still waiting for a ‘proper’ photo printer with refillable ink tanks.
While the addition of a grey ink to reproduce intermediate tones between black and white will improve the quality of photo prints from the new printers, the five-colour ink set does not encompass the full colour and tonal gamut of Epson’s six-colour Claria Photo HD ink set. It does, however, improve the chances of reproducing B&W prints free from unwanted colour casts, which is a welcome improvement on the CMYK inks.
Epson DOES make printers that use the full, all-dye Claria Photo HD ink set with CMYK plus light cyan and light magenta inks. It just doesn’t sell them in Australia – and we don’t know why the company has made this decision.
The EcoTank L1800 A3+ printer has been available since 2014 in Singapore, Malaysia, Europe, the UK, Russia, India, South Africa, Hong Kong, the Philippines and Brazil. Other models using the same ink set include the L805 (also A3+) plus the L810 and L850 A4 models. You can find them on Epson’s EU website.
Who’s it For?
While we can enthusiastically support EcoTank printers for normal office use, it’s difficult to recommend the ET-8500 and its A3+ sibling, the ET-8550, to photo enthusiasts because they’re not true photo printers. They can certainly produce photo prints non-specialists might deem ‘acceptable’ on the range of media we tested (glossy, semi-gloss and matte papers), but when you compare photo prints from the ET-8500 with prints from a ‘proper’ photo printer (like the Canon PIXMA PRO-200) the differences are obvious in both colour and tonal reproduction.
With no references for comparison, many people would be happy with the photo prints from these Epson printers, particularly B&W prints, which can look very nice. However, as outlined below, care is required when choosing the printing method and with paper selection.
Because they’re designed for office work, printers like the ET-8500 lack some key features of photo printers. Photographers will find they can only use ICC profiling when printing through an application that supports it, such as Photoshop or Affinity Photo. And even then, they will have to establish their own profiles for each paper they want to use
While they work well as general-purpose printers for high-volume situations, they’re too pricey to recommend as a regular office printer, even with the potential cost savings on inks. When you can purchase an EcoTank ET-2700 printer for less than AU$400, the RRP of AU$999 for the ET-8500 seems like a lot for a printer that offers a small improvement in photo print quality yet adds little or nothing to copying and scanning capabilities or integration with other devices.
That’s disappointing because we’d love to recommend purchasing printers with refillable tanks for photo printing as well as general office printing. This is an important change that could be made to reduce the plastic waste that is clogging up landfills and polluting oceans worldwide.
Releasing a full range of photo-capable refillable printers would provide a great marketing opportunity for Epson and Canon. Let’s hope they rise to the challenge – soon.
What’s in the Box?
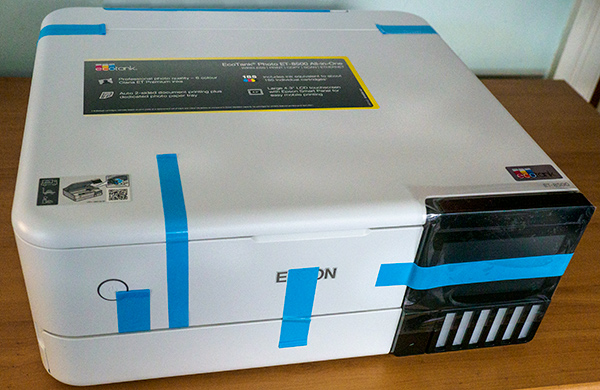
The printer is supplied in a cardboard box, sitting in a Styrofoam cradle. As is usual, all movable parts are held in place with blue sticky tape and it is packaged in a transparent plastic bag. It takes a few minutes to unpack it and set it up.
Also in the box is a brown cardboard package containing the power cable plus the ink bottles – 70 ml containers of each of the six inks, which are separately sealed in flexible, transparent plastic. There are two black inks, one a pigment black for text printing and the other a dye ink, which complements the cyan, magenta, yellow and grey inks.
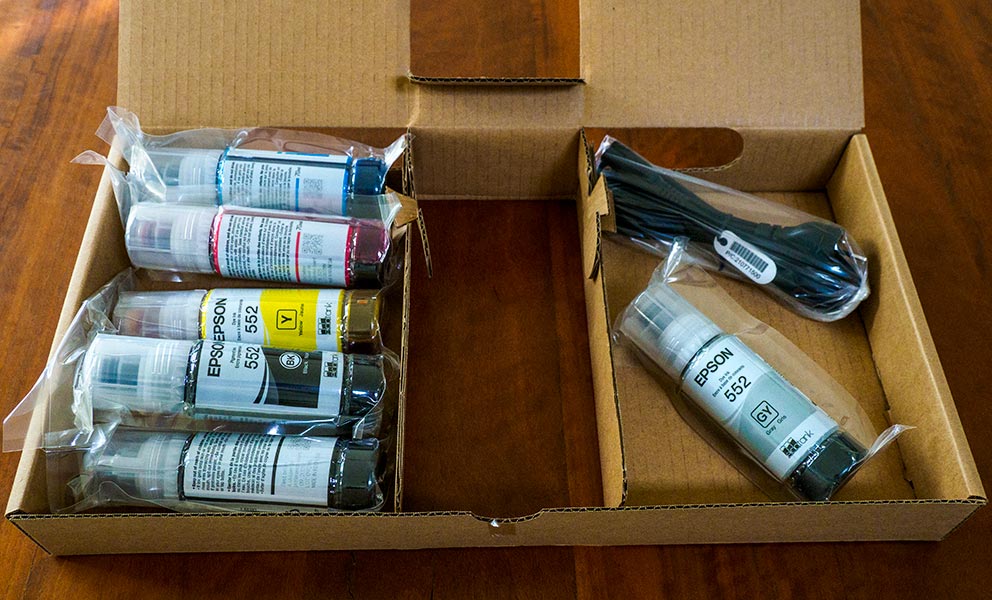
The ink bottles and power cable are packed in a separate cardboard container.
Sitting on top of the packaged printer are two plastic bags, one containing the setup instructions, Windows software disc and warranty sheet and the other a second plastic bag, which can be used if the printer has to be stored or relocated. No USB cable is provided.
Setting Up
Once you’ve removed all the packaging and plugged the printer into the mains power, setting it up is straightforward. You can follow the instructions on the printed sheet supplied or access step-by-step guidance via the LCD touch-screen.
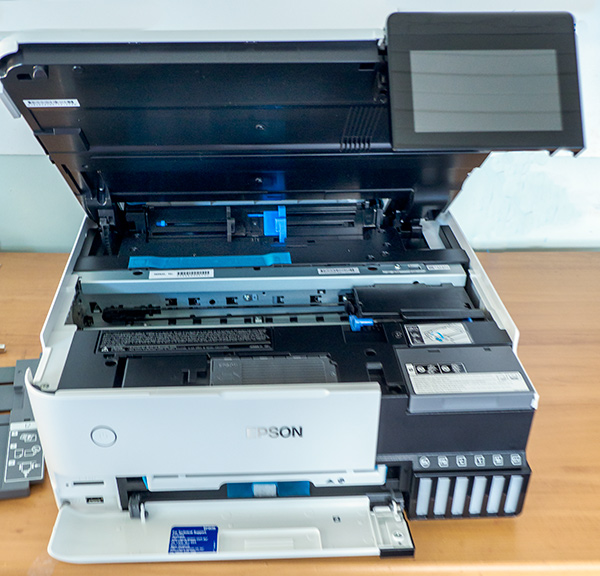
This view of the printer shows the scanner unit raised to provide access to the ink tanks.
The scanner unit at the top of the printer must be flipped up to access the ink tanks, which are in a compartment behind the LCD screen (which must also be raised).

The ink compartment.
Lifting the cover to this compartment reveals the six ink tanks, each of which has a flip-up lid. A coloured graphic (shown in the illustration above) on the underside of the lid shows which ink goes where and the bottles are physically ‘keyed’ so they only fit in the right place.
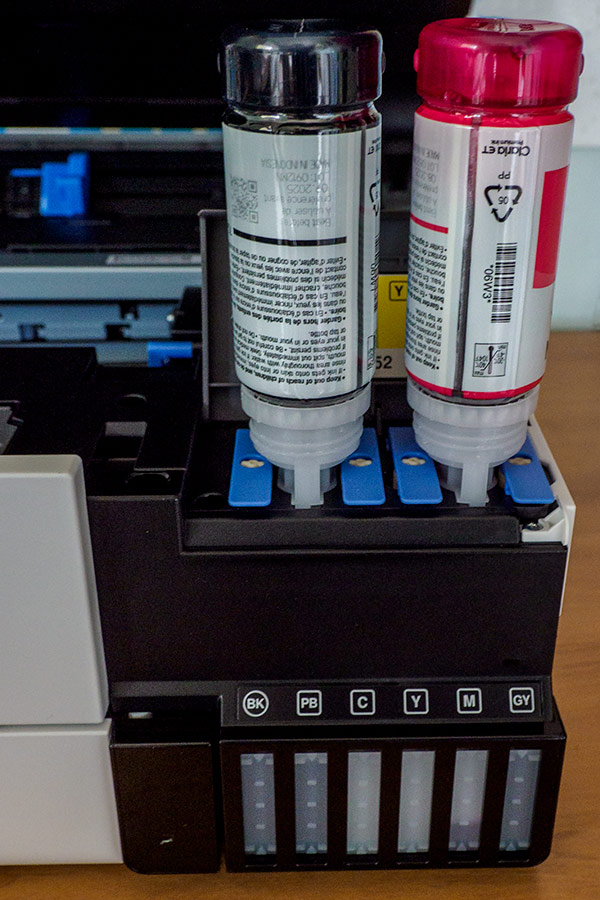
If you choose ink colour that are far enough apart you can fill two tanks at the same time. Note the ink levels in the translucent fronts of each ink tank.
Filling the tanks is easy; you simply unscrew the lid of the ink bottle and upend it on top of the appropriate tank. The ink flows into the tanks, stopping automatically when it reaches the ‘full’ level. When the tank is full you simply remove the bottle, re-cap it and store it somewhere safe. (There may be some ink remaining that could be used later.)
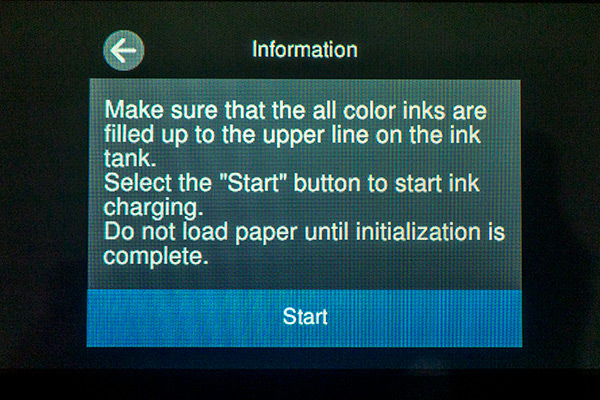
The LCD panel instructions for starting initialisation.
The initialisation process takes about seven minutes.
Once all the tanks are filled, you can close the lid, lower the scanner unit and initiate initialisation, a relatively noisy process that fills the ink lines and the print head and takes roughly seven minutes. Some ink will be absorbed by the pre-installed maintenance box during this process.
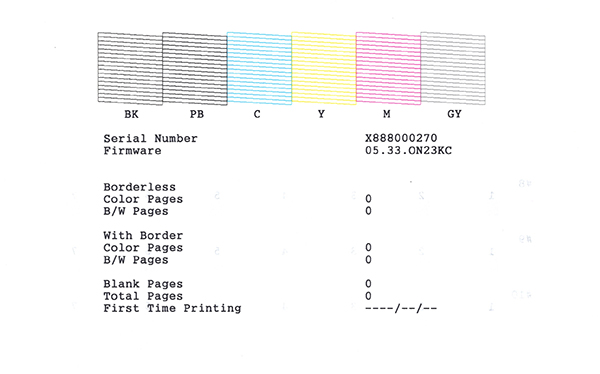
Nozzle check
The printer will want to produce a test print, so you’ll need to load at least seven sheets of plain paper in the main tray. The first test print is a nozzle check and the printer will extend the output tray above the loaded cassette.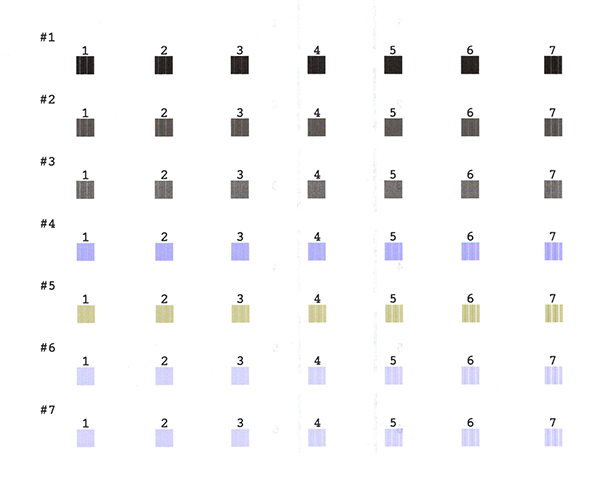
One of the alignment tests; you have to choose which block in each line has the least visible lines.
It will then want to print five sheets of alignment tests. You’ll be required to choose the best settings for each one, a process that will take several minutes.
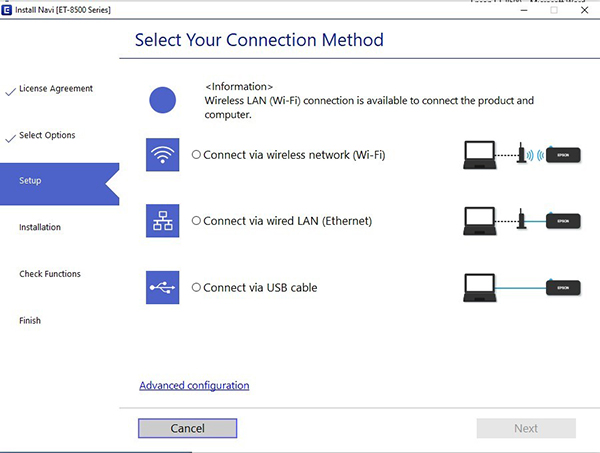
Connection options.
The next step is to connect the printer to a computer or a smartphone. The printer provides an option to download a remote control panel to a phone, should you wish to print that way. However, for our tests we chose to print from a Windows PC since it allowed us to explore a wider range of options.
You’ll be prompted to install the printer driver and select the connection method. Driver installation can be initiated from Epson’s website or via the supplied CD and if you select USB and plug in a USB cable, the computer will recognise it and prompt you to install the software.
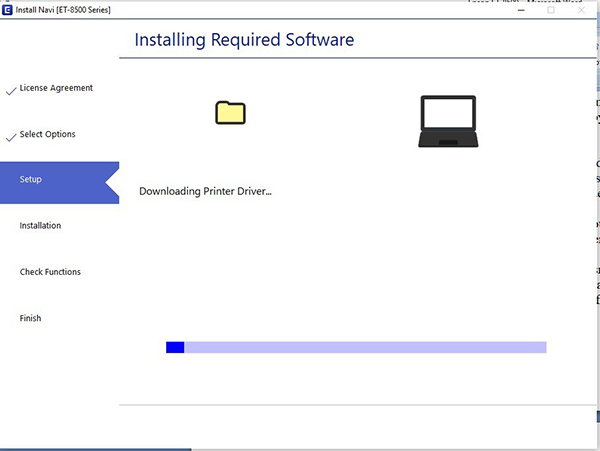
Driver installation.
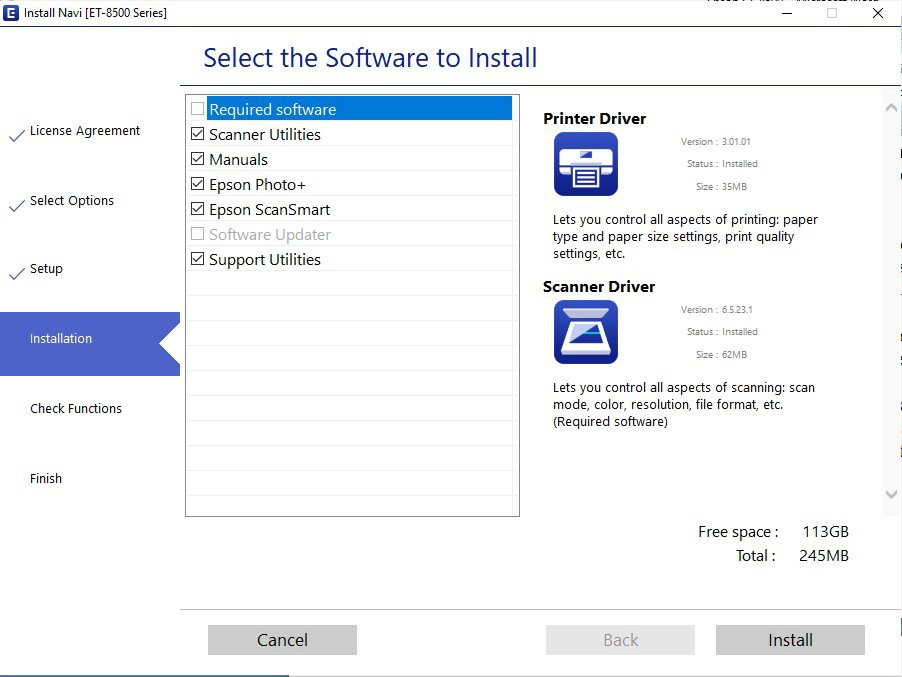
Software installation.
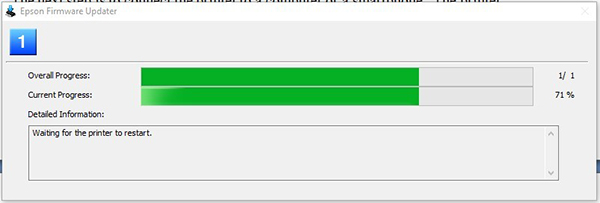
Firmware updating.
If a firmware update is available, you’ll be told to wait while it’s downloaded and installed. Make sure you don’t turn the printer off during this process. When the printer is all ready to go, the control panel will be displayed.
About Claria Inks
Epson’s most fade-resistant dye inks carry the ‘Claria’ brand, which claims ‘fade resistance of up to 300 years for prints stored in albums’. Since none of us will be around to verify that claim, the best we can do is expect them to have significantly better fade-resistance than regular inks.
If you’re seriously considering buying an EcoTank printer it’s important to understand the differences between the three Claria ink sets. The Home set consists of four inks: Cyan, Magenta, Yellow and black (K). The Premium set has five dye inks CMYK and Grey plus a black pigment ink (for printing text). In contrast, the Photo HD six-colour set is all dye inks: CMYK plus Photo Cyan and Photo Magenta.
While all sets can produce colour prints, there will be a visible difference between them. Claria Home inks are designed for everyday office printing and work best when printing documents and simple graphics. The Claria Photo HD ink set is designed for photo printing and is the only set with a chance of reproducing the full colour and tonal gamuts in digital images.
The Claria Premium ink set is a compromise solution. Designed mainly for everyday office printing it can also produce ‘acceptable’ photo prints – particularly from monochrome originals. With colour originals, the dyes can’t quite stretch to the colour gamut and saturation levels of the Photo HD inks. Uncritical observers will probably be happy with prints made with the Premium inks – but anyone with a photographer’s appreciation of colour will spot the limitations of the ink set.
Build and Ergonomics
Essentially box-shaped and fairly solidly built, the ET-8500 comes in white and black versions. Unfortunately, its cassettes and the flip-down front panel and extending output tray are rather flimsy as are the cover of the rear feed slot and the pull-up support in front of it. The tilting control panel is a bit sturdier and can be adjusted through 90 degrees.
Connectors for the power and USB cables are located on the rear of the printer and the cables are easy enough to install. Like the ET-7700 the ET-8500 has a card slot on the front panel with a USB slot below it for connecting external storage devices, although it only has USB 2.0 capability.
Four paper feed options are available, two at the rear and two cassettes that slide in below the printing mechanism. The rear paper feeder lies beneath a flip-up cover at the rear of the top panel. It has a pull-up paper support and can be used for printing on most types of paper at up to A4 size for cut sheets.
This feeder will accept pre-punched sheets with binding holes as well as photo stickers. Up to 40 sheets of plain or lightweight inkjet-printable paper or 20 sheets of heavier single-or double-sided photo paper can be loaded at a time.
The rear paper feed slot at the back of the printer is used for papers up to 1.3 mm thick, one sheet at a time. Paper cassette 1 is used for photo papers measuring 13 x 18 cm or 10 x 15 cm. This cassette has special fittings for each paper size and will accept up to 20 sheets of regular photo paper or one sheet of stickers. Heavier glossy and semi-gloss papers are restricted to 10 x 15 cm sizes.
Paper cassette 2 is designed mainly for A4 sheets and will accept up to 100 sheets of plain paper, 80 sheets of lightweight ‘photo quality’ inkjet paper or 20 sheets of most other photo papers. Double-sided papers are best loaded via the rear paper feeder and stickers of transfer paper sheets can be loaded one at a time.
While the LCD panel provides an adequate range of settings for business use, the printer driver provides a much wider range of settings, although it’s only accessible when you print through software via a computer. When printing from an SD card or USB thumb drive, you’re reliant on the LCD screen, the limitations of which are outlined in the ‘Stand-alone Printing’ section below.
Like most printers, the ET-8500 can print on user-defined paper sizes, but only when using the dialog boxes in the driver menu (shown below). Paper sizes can be set in millimetres or inches with a range of widths between 54 and 215.9 mm and lengths from 86mm to two metres.
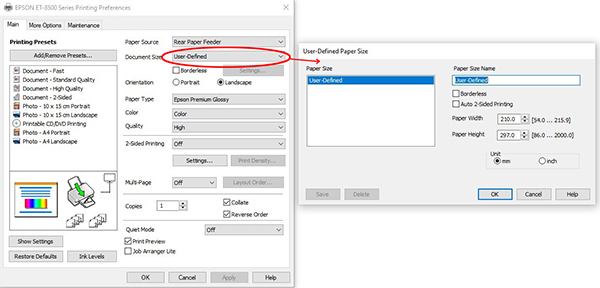
Custom paper sizes.
If you need to move the printer there are a few cautions to observe. Because the ink tanks can’t be completely sealed to allow air to enter when compensating for falling levels and changes in atmospheric pressure, the printer should not be turned on its side. In addition, the print head should be locked down when it is moved. A plastic bag is provided to contain potential spills in situations in which the printer must be moved.
Stand-alone Printing
Like its siblings, the ET-8500 can be used as a stand-alone printer and driven through its LCD screen. The control panel (shown below) provides icons corresponding to the list below the screen grab.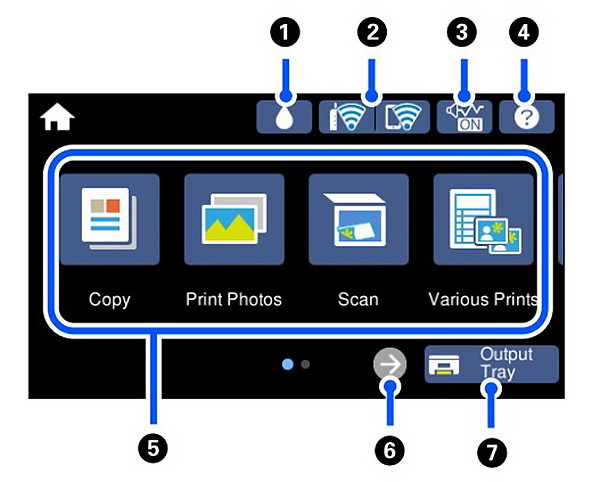
The control panel.
1. Shows the status of the maintenance box.
2. Displays the network connection status.
3. Indicates the ‘Quiet Mode’ is enabled. In this mode, operating noise is reduced but print speed may slow.
4. Displays the Help screen, which shows operating instructions and troubleshooting.
5. Contains the touch-screen buttons for opening each function.
6. Scrolls the screen to the right.
7. Stores the output tray.
If you select Print Photos, the only option provided via the control panel is printing from an SD card or USB-connected device. The menu provides the following settings: Browse, Select Photos, Display Mode, Print Settings, Photo Adjustments, Filter and Crop/Zoom.
Unfortunately, while you can choose between borderless and bordered, you can’t adjust the margin sizes, nor control the aspect ratio of the printed image. The Browse setting only lets you browse by date, while Select Photos only lets you choose between all photos and one image. The Display Mode provides a choice between 1-up (with and without information) and 9-up. You can also select the number of copies you want to print (up to 99)
The Print Settings sub-menu is more comprehensive with a choice of four paper sizes (selected by toggling the left/right arrows), three paper types (all glossy), the paper source (Cassette 1 or Cassette 2 or Rear Paper Feed Slot), Bordered or Borderless, Draft, Standard or Best quality and Expansion of the border around the image. You can also opt to print the date on the photo or label it with Camera Text info or the name of a landmark. Other settings include Fit Frame, which automatically crops the photo to fit into the selected photo layout, and Bidirectional, which slows down printing to improve print quality.
The Photo Adjustments sub-menu offers the following selections: Enhance (covering PhotoEnhance, Print Image Management and Off), Scene Detection (Automatic, People, Landscape, Night Scene) and Fix Red-Eye. There are also five-step adjustments for each of the following parameters: Brightness, Contrast, Sharpness and Saturation.
Filter options let you choose between Sepia and B&W, with Off the default setting. Cropping is based upon the paper size selected for printing. The arrows are used to select the area to print, while the Home button rotates the crop through 90 degrees and the + and – buttons zoom in or out.
The adjustments are quite limited with little scope for fine-tuning. You can’t straighten images that are slightly askew, and if you make a mistake and want to change a setting like the paper source selection you must cancel printing and start again.
Printing from a Computer
Printing from a computer was relatively easy and provided a much wider range of adjustments, although not quite as wide as those found in Epson’s dedicated photo printers. We were able to print from all the software applications we commonly use, although we often had problems when printing from Photoshop.
Selecting File>Print for an image in Photoshop would often cause it to close down after a few seconds’ pause. We weren’t able to find a consistently successful solution to this problem, although we tried Adobe’s advice of hitting the spacebar on the keyboard while selecting the Print command. We also went into the Settings menu and set the paper feed, size and media type that way when the printer’s control panel wouldn’t allow changes to be made. Although these solutions worked sometimes, none was consistently reliable.
No issues were encountered when printing through Epson Print Layout, which is available as a free download for devices running Windows, Mac OS and iOS and includes a Photoshop plug-in. We’d recommend using this software for photo printing.
Documents printed in the course of our tests ranged from simple draft quality copies of emails through to PDF documents containing text and graphics. No problems were encountered in the course of our tests.
Printing Times
On average, between 18 and 20 seconds were spent spooling, where the application containing the document or image organises the data and transfers it to an internal memory in the printer, from which it can be printed. Once this has been done, printing is initiated.
We measured the following printing times when printing from a computer:
An A4 document page took between 20 and 35 seconds, depending on the amount of information on the page and whether images and/or graphics were present.
An A4 colour photo with narrow margins took approximately one minute at Standard quality and three minutes and 30 seconds with the High quality setting. These times were reduced be a few seconds when the same sized B&W photos were printed with the Black & White Photo setting.
A B&W Photo at High quality took three minutes and 10-11 seconds on Glossy and Semi-gloss papers and two minutes 8-10 seconds on matte paper. Borderless printing added between five and 40 seconds to output times, depending on the quality level selected.
Printing images from an SD card also took slightly longer than printing from a software application on a computer, with between two and 15 seconds added to output times.
Wireless printing includes both standard infrastructure mode and Wi-Fi Direct for communicating with a computer via a wireless router or access point. Setting up is wizard-based and the link is password protected. Once set up, you can use the wireless connection to print directly from a PictBridge compatible camera.
Scanning and Copying
These functions are essentially the same as in other Epson multi-function printers and based on a scanner with a regular LED light source plus CIS (contact image sensors) technology. The copying function is only available for standard paper sizes, which range from 102 x 152mm (snapshot size) through to A4 and Letter 216 x 279 mm) sizes. You can’t use other functions while copying is taking place.
Users can take advantage of auto duplexing, which can print on both sides of a single sheet of paper. When copying, two single-sided originals can be copied to one sheet of paper with this method. Users can copy in colour or B&W and preview documents before copying.
Standard copy features include density adjustment, auto background removal for text, multi-page to single-page copying, layout adjustments (border or borderless), fit to page, automatic reduction and enlargement (25-400%), photo reprints and enlargements, colour restoration of old faded photos and copy onto a CD/DVD. Photo prints can be made in various layouts, such as 2-up or 4-up.
Scanning options provide additional functions including scanning to a memory card, scanning to a computer, scanning to a cloud service or, for Windows users, scanning via Web Services for Devices (WSD). You can also save scans directly to smart devices using the Epson Smart Panel application on the device.
When driven from the LCD screen only two options are available: scanning to PDF or scanning to JPEG. You’re required to use Epson’s bundled ScanSmart software to set up the scanning parameters and initiate scans.
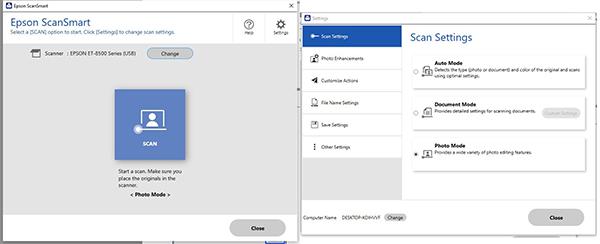
Epson’s ScanSmart software provides an interface between the ET-8500 and your computer.
Otherwise, scanning features are the same as the ET-7700 and other Epson entry- and mid-level scanners and covered in our review of that printer.
Scanned documents and images can be sent to a computer, cloud service, smart device or WSD-connected device or be saved to a memory card or USB thumb drive that has been plugged into the printer.
Performance
Most printers that use dye-based inks will produce the best-looking photo prints on glossy or semi-gloss paper. That was true to some degree with the ET-8500 unit we tested, although equivalent prints made with the 8-colour dye-based Canon PIXMA PRO-200 printer had more vibrancy and slightly better tonal reproduction.
The results we obtained with matte paper with the ET-8055 were almost as good as the semi-gloss prints, although (as expected) they weren’t quite as lively-looking as the glossy prints.
We had no issues with paper feeding from the cassette or through the rear sheet feed. We didn’t have suitable paper to try out printing on thicker media and we didn’t try printing on optical discs.
B&W Printing
We tried three methods for printing B&W images: the Black & White Photo setting provided in the printer driver (which uses only the dye inks), a black ink only method developed by our friend and colleague, Trevern Dawes, which uses only the black pigment ink and the default settings with Epson’s Advanced B&W mode, which is only accessible through Epson Print Layout. All produced relatively neutral-toned monochrome prints with little or no evidence of bronzing or gloss differential.
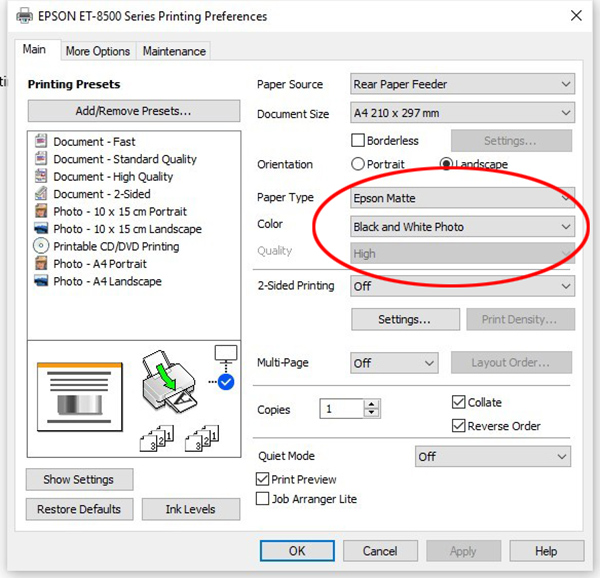
The default settings in the printer driver for printing B&W photos circled in red. Note that output quality defaults to High and is not adjustable.
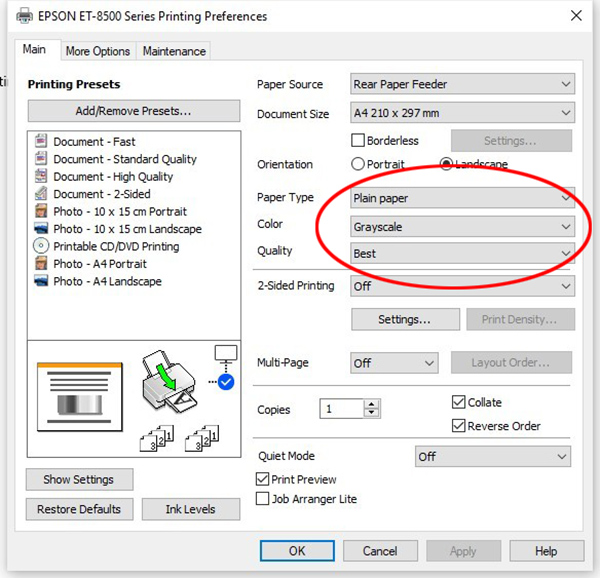
With the black ink only method you must select the plain paper setting plus greyscale and the best image quality, as shown in the settings circled in red.
The black ink only method is worth exploring with four- or five-ink printers because it uses only the pigment ink. In theory, this method should give you longer-lasting prints (because of the pigment ink) without any colour casts.
To enforce this option, you must set the paper to ‘plain paper’ so the printer ‘thinks’ it is printing documents. You must also select the ‘greyscale’ setting and the highest quality option.
This printing method delivered good – but a little contrasty – results with matte papers but with glossy and semi-gloss papers, the print surface was marred with fine track marks, which extended onto the trailing edge margin. We don’t know what caused them since checking and unchecking the ‘Bidirectional Printing’ box on the ‘More Options’ page of the driver made no difference to the end result.
As a result, we’d only recommend this method for matte papers. We also noticed a slight difference in tonality between prints made with this method on glossy and matte papers, with prints on glossy paper showing a very slight yellow-green tinge and those on matte papers verging on slightly magenta. Again, both prints should have been totally neutral since this method is supposed to use only the pigment black ink.
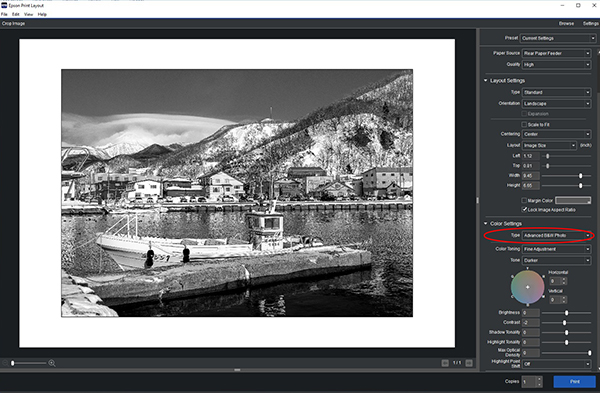
The Advanced B&W mode (circled in red) is only available in Epson Print Layout and provides the best results plus the greatest adjustments flexibility.
The best results came through using the Advanced B&W mode, where the default settings delivered similar results to the Black & White Photo setting but provided much more scope for adjusting brightness and contrast and tweaking image tones before printing. Printing times were similar to those recorded for colour prints
Cost Factors
It’s difficult to gauge ink usage because the status monitor graphic (shown below) is relatively crude. The ink tanks have translucent panels that provide a visual check but they still only permit a rough estimation of the amount of ink remaining.

The ink status monitor provides a very approximate estimation of ink levels remaining in the refillable tanks.
However, if you deduct the value of the ink (6 bottles at AU$29.99 per bottle = $179.40) from listed price of AU$999 for the printer, the actual value of the printer is AU$819.60, which is still pretty high for a general-purpose printer. Epson claims the printer comes with enough ink to print up to 4,900 document pages, or 1,800 snapshot-sized (4 x 6 inch) photos but those claims are based on ISO tests, which don’t necessarily reflect actual usage, especially if you’re using it for photo printing. https://epson.com/iso-print-speeds
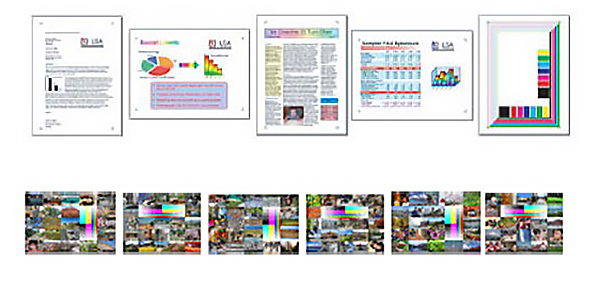
The test targets used by Epson to gauge ink usage.
You can fit just over four snapshot-sized photos onto an A4 sheet of paper, which would equate to around 450 A4 photo prints from the ET-8500’s ink set. By our calculations, the cost in ink to print one A4 photo in colour, using the ISO/IEC 24712 pattern standard is around 40 cents per page. By comparison, document pages work out at around 0.4 cents per page.
In comparison, we calculated the per page cost for the Canon PIXMA PRO-200 printer at 71 cents for an A4 photo print at the cheapest ChromaLife 100+ ink we could find at the time. But that printer is a dedicated photo printer, which uses dye inks eight different colours, supplied in relatively low (12.6 mL) capacity cartridges. And prints produced by it are noticeably better to the discerning photographer’s eye than equivalent prints from the ET-8500.
Conclusion
Please Login or Register to access the Conclusion.
SPECS
Printer type: Multi-function thermal inkjet printer/scanner/copier
Printing method: Piezoelectric on-demand inkjet
Ink system: 6-ink EcoTank
Inks: Claria ET Premium 552 Black, 552 Photo Black, 552 Cyan, 552 Magenta, 552 Yellow, 552 Grey (70 mL bottles)
Nozzle configuration: 360 nozzles black, 180 nozzles per colour
Minimum droplet size: 1.5 picolitres (with Variable-Sized Droplet Technology)
Max. Resolution: 5760 x 1440 dpi
Paper sizes: A3+, A3, A4, A5, B4, B5, Letter, Legal (8.5” x 14”), Ledger, 4″x6″, 5″x7″, 8″x10″, 10″x12″, Envelopes (DL, COM10), User defined (55.88 x 86.36 mm, to 215.9 x 1998.98 mm)
Media handling: Auto duplexing (A4, plain paper), borderless print, CD/DVD print, fine art paper path, rear specialty media feed, thick media support
Max. paper thickness: 1.3mm (rear straight pass)
Ink Yield (ISO Pages): Photo Black: 7300, Black: 6700, Colour: 6200 (based on the ISO/IEC 24712 pattern with Epson’s methodology)
Scanner: A4 flatbed CIS (contact image sensor), Max. resolution 1200 x 4800 dpi; output formats – BMP, JPEG, TIFF, multi-TIFF, PDF, searchable PDF, PNG
Interfaces: Hi-Speed USB (2.0), Wi-Fi (802.11b/g/n/a/ac) with Wi-Fi Direct support, Ethernet (10/100), SD card slot; mobile printing support for Apple AirPrint, Scan to Cloud
Display: Tilting 4.3-inch colour LCD
Power consumption: Typical electricity consumption – 0.15kWh; Standalone copying (ISO/IEC 24712 pattern): 17W; Ready Mode: 7.4W; Sleep Mode: 0.8W; Power Off Mode: 0.2W
Acoustic noise: Max. 47dB/A
Dimensions (wxhxd): 403 x 612 x 347 mm (printing); 403 x 369 x 162 mm (storage)
Weight: 8.4 kg
Distributor: Epson Australia, (02) 8899 3666
Rating
RRP: AU$999
- Build: 8.5
- Features: 8.8
- Print quality: 8.7
- Print speed: 8.8
BUY