Canon PIXMA PRO-200 A3+ Photo Printer

In summary
The PIXMA PRO-200 represents a significant improvement on the PRO-100 model it replaces; it’s more compact, better designed and easier to operate, thanks to the LCD control panel and improved software. The ink set also appears to deliver richer, more accurate colours.
If you prefer printing on glossy or lustre paper, the PRO-200 will be a good investment, especially if you don’t need to make prints larger than 329 x 483 mm. It’s straightforward to set up and easy and one of the most affordable to run on the basis of ink cost.
Full review
Although it was due for release in November 2020, it’s taken until mid-February 2021 for Canon’s new PIXMA PRO-200 dye-based A3+ inkjet printer to reach our desk. Replacing the PIXMA PRO-100S, it provides an alternative to the pigment-based imagePROGRAF PRO-300 we reviewed last year. Features shared with that model, include a smaller footprint and improved efficiency and versatility over its predecessor. But its eight-colour dye ink system is updated with new magenta and black inks that support an expanded colour gamut for reds and blues plus higher black density for a more faithful reproduction of blacks. The built-in colour LCD control panel makes the PRO-200 easier to operate than its predecessor.
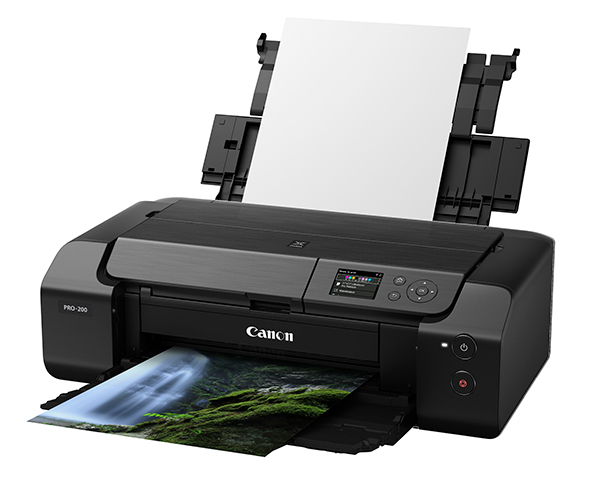
Angled view of the new PIXMA PRO-200 printer. (Source: Canon.)
The ink colours are the same as in the earlier models and include Y/M/C/PC/PM/Gy/LGy/BK inks but they have been improved in unspecified ways. The set includes dark and light grey inks to produce black and white prints free of unwanted colour casts and ensure smoother tonal gradations in shadowed areas. All cartridges carry the CLI-65 label, confirming they contain Canon’s relatively durable ChromaLife 100+ inks.
To the best of our knowledge, ChromaLife100+ inks are rated for about 10 years fade resistance when displayed without any protection or about 40 years when displayed behind glass. Prints made with these inks are said to be able to last for more than 200 years in a photo album, which makes this printer ideal for photo book printing.
However, it’s worth noting that durability depends on the paper they are printed on. Print durability is generally greater with pigment inks, which are normally rated for up to 60 years exposed to light and over 200 years in a photo album. But that too will depend on the media used.
Compatibility with Canon’s Professional Print & Layout PC software means the PIXMA PRO-200 can integrate seamlessly with professional print workflows. It also supports various software extensions including the Media Configuration Tool PC utility along with image editing applications like Canon’s Digital Photo Professional and Adobe’s Photoshop and Lightroom.
Borderless printing is supported at the highest quality in all print modes, across a wide variety of media, including fine art paper. Three connectivity methods – Wi-Fi, Ethernet and USB – allow it to be used in different environments including the office or studio, shared work spaces and at home.
Who’s it For?
The PIXMA PRO-200 is designed (and priced) to attract photo enthusiasts, particularly those who prefer printing with dye-based inks and tend to use glossy, semi-gloss or lustre media for most of their output. Professional users might also find this printer attractive for the same reasons, although they could be put off by the relatively low (12.6 mL) capacity of the ink cartridges.
There’s a reason for keeping the cartridges small: it allows them to be carried on the print head, removing the need for flexible tubes to carry the ink from static tanks. This system also means the actual printer can be smaller in size.
As with the imagePROGRAF PRO-300, this printer could suit photography schools and outlets offering limited edition print runs. With a similar footprint to the Pro-300, it would be easy to fit into most working environments.
If you already have a PIXMA PRO-100 printer that’s in working order, upgrading may be worthwhile to get the LCD control panel, which certainly makes the PRO-200 easier to use. As far as saving money is concerned, while the PRO-200 is more economical to run, it would take many a great prints to recoup the investment costs of buying a new printer.
What’s in the Box?
The PRO-200 comes in a cardboard box that is 725 mm long, 465 mm deep and 335 mm in height. The printer itself has a footprint of 639 x 379 x 200 mm, which makes it slightly larger than the PRO-300. And at 14.1 kg it weighs 30 grams less.
Included in the box you’ll find the print head plus eight individual dye ink cartridges (the full 12.6 ml capacity in their normal packages), a power cord, a CD printing tray, a software CD-ROM (Windows only; MacOS drivers are available online) and several printed guides and notes. A USB cable is NOT included but the user manual can be downloaded here. https://ij.start.canon This link also allows you to acquire the latest driver and software.
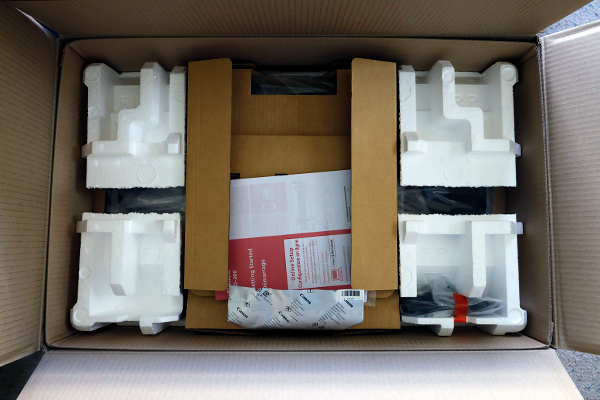
The PIXMA PRO-200 as delivered.
As with the PRO-300, the contents of the box are packed in Styrofoam, which is split to enable the top sections to be removed. The printer comes in a similar heavy-duty plastic bag with handles at each end and is strong enough to enable you to lift the printer onto a desktop.
As usual there’s a fair bit of packaging and you’ll have to spend ten minutes or so removing the strips of orange tape and plastic mouldings that keep everything in place while the printer is in transit.
Setting Up
Allow half to three-quarters of an hour to make the printer ready for printing, following the instructions in the starter guide, which are similar to those provided for the PRO-300. As with the PRO-300 the PRO-200’s LCD panel will display animated guides to show you what to do once you’ve set the language and date/time.
Like the PRO-300, this printer’s ink tanks ride on top of the print head so the first step is to plug in the power cable and switch on the printer. Opening the top cover shifts the head carriage across to the left so you can install the print head.
The print head comes in a sealed plastic bag with its contact points and ink outlets protected by an orange shield. Remove the head from the bag, take off the shield without touching the contacts and raise the locking lever on the right before slipping the head in below the grey bar. Lower the lever to lock it in place.
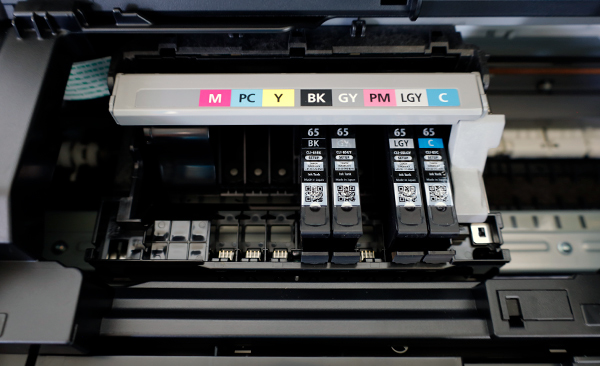
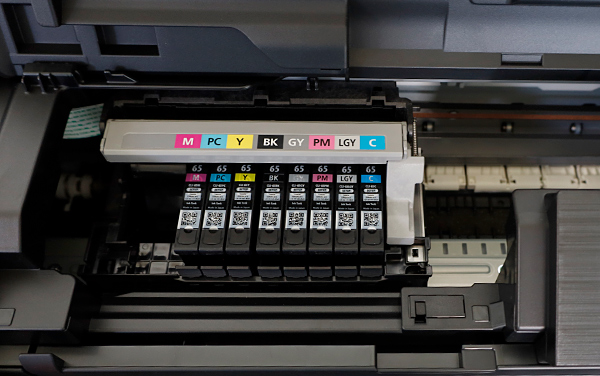
Installing the ink cartridges in the print head.
The ink cartridges are also individually packaged with orange plugs to seal their outlets. When the packaging is removed they can be clicked into place in their colour-coded slots. Once all inks are installed, closing the cover triggers the initialisation process. The printer must be left to ‘do its thing’ until it lets you know it is ready to use.
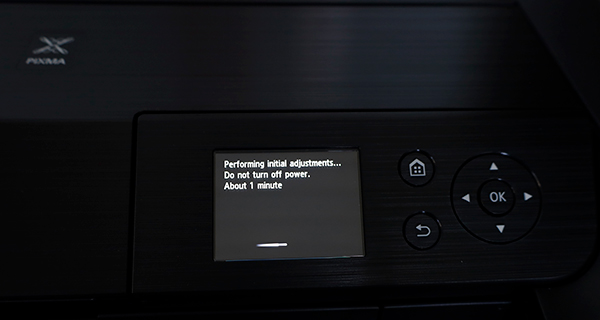
The display on the LCD control panel as the printer is initializing following ink cartridge installation.
When this point is reached it’s a good idea to run a print head alignment check – and the printer will offer this suggestion. It requires two sheets of plain paper in A4 or Letter size and will produce two different test patterns that will show whether the inks are being laid down correctly. (This process should be repeated periodically and should be repeated after the first depleted cartridge is replaced to refine the adjustments.)

Print head alignment.
The next step is to load the printer driver, which can be done from the supplied CD is you’re a Windows user or downloaded from Canon’s website. Note the download will give you the most up-to-date driver and make it easy to connect the printer to a computer and set it up to print. .


These screen grabs show the steps involved in installing the printer driver and accessing instructions for connecting it to a computer.
Of the three connection options – via USB cable, via wired LAN or to an existing Wi-Fi network – we chose the USB connection. If you’re connecting to a wireless network you’ll need things like passwords and permissions and you may need to reset security clearances.

The three methods for connecting the printer to other devices.
We had no problems connecting the review printer to a Windows 10 system. Mac OS users should check out the setup procedures in Keith Cooper’s report as he identified a potential issue with the Mac AirPrint setup.
Two of the links provided on Canon’s website.
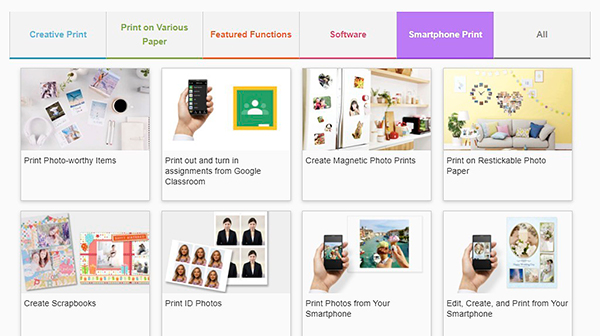
The website also provides additional information with links to various functions, including for smartphone printing as well as additional software such as Canon’s Professional Print & Layout and Media Configuration Tool.
Professional Print & Layout can be used to print directly from Canon’s Digital Photo Professional or can operate as standalone software or as a plug-in with Adobe’s editing software. Media Configuration Tool is a customisable software utility that registers new media types selected by the user to the printer and related software. When new paper supported by the printer is added, the media information file can be downloaded and added to the printer.
Paper Feeds
Like the PRO-300, the PRO-200 provides two paper feeds: a main top feed and a manual feed that flips out from the back of the printer. A feed slot cover flips down to prevent stray items from falling into the chute while the printer is operating. It must be raised each time new sheets of paper are loaded.
Both feeds have pull-out paper supports to help the media feed in correctly and adjustable guides to hold the paper in position. Paper (including envelopes) should always be loaded in portrait orientation and, like the PRO-300, the PRO-200 uses a central feeding system to minimise mis-feeds. We encountered no issues with paper feeding during our tests, which included printing on paper with non-standard sizes.
The top feed chute is a general-purpose feeder that accepts sheet sizes from 10 x 15 cm up to A3+ in size and up to 300 gsm in weight/thickness. It can accommodate up to 50 sheets of plain document paper, 10 sheets of A4 photo paper but only one sheet at a time for A3+ media.
The manual rear feed tray is for papers measuring 20 x 25 cm and larger. Accepting one sheet at a time, it should be used for thicker ‘fine art’ media up to 350 gsm or from 0.1 to 0.6 mm thick.
Either slot can be used for printing on ‘Custom’ sized media in a range of widths from 89 to 330.2 mm and lengths from 127to 990.6 mm. The control panel can also be set to detect paper mismatches and display an error message.
Like other Canon A3 printers, the PRO-300 can’t use roll paper, which limits its overall capabilities. However, it does allow users to print with Custom sizes up to 330 x 990.6 mm, which provides some scope for panorama printing if you’re prepared to cut roll paper to a size between those limits.
Users can also print on Canon’s NL-101 Printable Nail Stickers, which come in two-sheet packs of 108 x 48.5 mm sheets. It can also be used to print on Canon’s iron-on transfer media, which are available for use with dark or light fabrics and come in five-sheet A4sized packs.
The PRO-200 is also supplied with a ‘multi-purpose tray’ for printing on specially coated optical discs. It’s stored under the printer body and fits into a special slot behind a pull-down panel above the output tray.
In Use
The printer’s control panel is the same as the one in the PRO-300 and is used to display status messages and access essential functions. As with the PRO-300 its menu is comprehensive enough to enable the printer to be operated as a stand-alone unit. We’d advise potential buyers to ensure the media settings on the screen match those selected in the printer driver whenever they embark on a new printing project.
The printer driver is essentially the same as the PRO-300’s and straightforward to use. The PRO-200’s custom print sizes can be set for sheets up to 330 x 990.6 mm in size. Canvas is not included in the list of recommended media.
Printing Times
Regardless of the size of the media we printed on, the PRO-200 devoted between13 and 15 seconds to spooling (organising the image data prior to engaging the print head) before it actually started printing. This is normal and the time involved is average for printers of this type. We measured the following average printing times (including spooling) – measured from when we initiated the print sequence to when the print emerged completed from the printer – for the different paper sizes and output quality settings we tested:
A4 prints at Standard quality – 49 seconds;
A4 prints at High quality – 1 minute 56 seconds;
12×12-inch at Standard quality – 2 minutes 8 seconds;
12×12-inch at High quality – 3 minutes 8 seconds;
A3 prints at Standard quality – 1 minute 42 seconds;
A3 prints at High quality – 2 minutes 48 seconds;
A3+ prints at standard quality – 2 minutes 55 seconds;
A3+ prints at High quality – 5 minutes 57 seconds.
In each case, the prints had white borders of between 10mm and 15mm. Printing times were about 20% longer when borderless prints were made.
Ink Consumption
Because we obtained a brand new printer for this review, we’re able to provide a better estimate of average ink costs than we could for the imagePROGRAF PRO-300. Our calculations are based on measuring the actual areas covered by printed images.
The first ink to run out was Light Grey, which had to be replaced after we had printed 15 A3 prints with borders plus four A4 prints. After that, ink cartridges were depleted in the following order: Photo Cyan, Grey, Black and Yellow.

The ink status monitor when we measured ink consumption.
When the Grey ink needed to be replaced, we measured the area of the images we had printed and also estimated the amount remaining in the other cartridges by capturing a screen grab of the printer’s ink status monitor (shown above) and measuring the length of each coloured bar to work out how much ink remained in the cartridge. We obtained the following estimates of the amount of ink remaining:
Magenta = 8.5 ml
Photo Cyan = 4.7 ml
Yellow = 3.5 ml
Black = 3.5 ml
Grey = 1 ml
Photo Magenta = 7.2 ml
Light Grey = 4.7 ml
C = 7.4 ml
At this point the ink used had covered 45,870 square centimetres of paper and we had used 37.8 ml of ink. This showed that one millilitre of ink can cover approximately 0.0008240 cm2 of paper, given average usage. From these measurements we estimate 37.8 ml of ink was used to cover 4.587 square metres of paper, leaving 63 ml remaining of the original amount of 100.8 ml in the eight-cartridge ink set.
Buyers of Canon printers are fortunate in having a wide range of outlets from which to buy replacement cartridges, which means discounting is relatively common and often quite substantial. The highest price we found for individual cartridges for the PRO-200 was AU$29.95 (= $2.38/ml), while the lowest was $20.68 (= $1.61/ml) – both offered by local online re-sellers. So it pays to shop around.
While you can save money by purchasing eight-cartridge bundles of the inks, it’s probably not advisable since the cartridges will become depleted at quite different times. For that reason, we’ve based our calculations on the prices for individual cartridges and provided figures for the highest and lowest cartridge prices we found. The table below shows the range of average costs per print with 10 mm margins for standard paper sizes:
| Print size | @$2.38/ml | @$1.61/ml |
| A4 | $1.03 | 71 cents |
| A3 | $2.17 | $1.50 |
| A3+ | $3.40 | $2.35 |
These figures correspond quite closely with the figure obtained by Red River Paper in Dallas, Texas, which are published in its ‘The True Cost of Inkjet Printing’ report, which we’d encourage readers to consult. Note: allowances should be made for the differences in paper sizes (Imperial measurements are used in the USA so papers are measured in inches) and currency conversion.
It’s much easier to calculate the costs of the paper you print on, especially when you buy paper in sheet packs. However, it should be noted that ink usage will vary, depending on the density of the tones in the image; high-key images will use less ink than those with a preponderance of dark tones. Our figures represent averages, measured over a significant print area when printing images that varied widely in tonality.
Conclusion
Please Login or Register to access the Conclusion.
SPECS
Printer type: Thermal inkjet
Print head: Permanent with 6144 nozzles (768 per ink colour); FINE (Full Photolithographic InkJet Nozzle Engineering) Print Head Technology
Resolution: 4800 x 2400 dpi
Paper sizes: A3+,A3, A4, A5, B4, B5, LTR, LGL, Ledger, Hagaki, 7 x 10 inch, 12 x 12 inch, 4 x 6 inch, 8 x 10 inch, 127 mm square, 210 x 594 mm, Envelopes ( DL, COM10); Max. Custom size – 254 mm 990.6 mm (manual feed only)
Max. paper thickness: Approx. 380 gsm (~0.6 mm)
Optical disk printing: Yes; 12 cm only
Ink system: ChromaLife 100+ Dye inks
Ink cartridges: CLI-65BK Black, CLI-65C Cyan, CLI-65GY Grey, CLI-65LGY Light Grey, CLI-65M Magenta, CLI-6PC Photo Cyan, CLI-65PM Photo Magenta, CLI-65Y Yellow
Cartridge capacity: 12.6 ml
Interfaces: Hi-Speed USB (2.0), Wi-Fi (802.11b/g/n) including PictBridge, Ethernet, 3-inch LCD colour display panel
Power consumption: 1.6 W (printing), 1.0 W (standby), 0.2 W (off)
Acoustic noise: 42.5 dB
Dimensions (wxhxd): 639 x 379 x 200 mm
Weight: 14.1 kg
Distributor: Canon Australia; 1800 021 167
Rating
RRP: AU$899; US$599
- Build: 8.9
- Features: 8.9
- Print quality: 9.0
- Print speed: 8.8
BUY