ACDSee Photo Studio Ultimate 2021

In summary
Expect to spend a lot of time coming to grips with the ins and outs of this complex – and comprehensive – application. However, if you’re prepared to spend the necessary time mastering its complexities – and if you want an all-in-one application that can be used for an entire imaging workflow, ACDSee Photo Studio Ultimate 2021 is certainly worth considering, which is why we’ve recommended it.
Full review
We published a comprehensive review of ACDSee Photo Studio Ultimate 2020 in April last year so this review will concentrate upon the new and improved features in the latest iteration of the software. In our conclusion to the previous review we commented on the wide range of workflow management options (including ingesting, editing and outputting as well as raw file conversion) in the software but noted the complexity of the user interface (seven separate modes) and the attempt to provide a bit of everything for everyone can make it frustrating to use. We hoped the latest update might address at least some of those criticisms.
Box shot of ACDSee Photo Studio Ultimate 2021. (Source: ACD Systems International.)
Photo Studio Ultimate 2021mkes some substantial claims about speeding-up image processing. The new version is said to be 100% faster to start-up, 50% faster for mode switching and 10-0% faster when working with keywords and categories, 20% faster for raw file decoding, 40 times faster for database loading with ‘significantly improved’ decoding of HEIC files. It also includes a number of new features, which are outlined below.
The user interface in the latest version hasn’t changed much since last year’s edition. If anything, it’s more complex, thanks to the additional features, which means it’s at least as challenging for novice users to navigate. Readers who have used other, simpler, applications will almost certainly find aspects of it difficult and non-intuitive so we recommend downloading the 30-day trial version before making a commitment to buy.
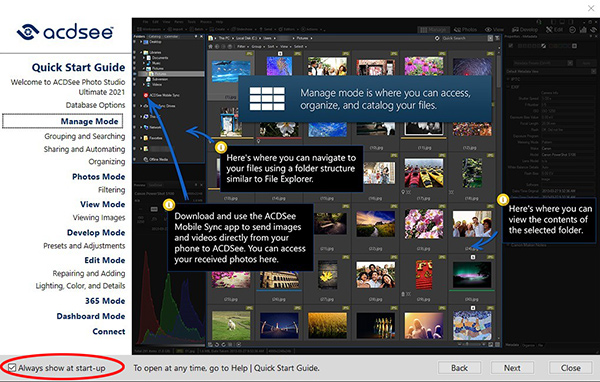
The Quick Start Guide.
When you’ve installed the trial download, you’ll need to find your way into the working area of the application through a series of rather annoying pop-up screens, the best of them being the Quick Start Guide. As in the previous edition, this interface steps you through the various features of the software and shows how to access them so it’s worth checking out if you’re unfamiliar with ACD’s software. By default, if you don’t de-click the box circled in red on the screen grab above this screen will open each time the application is started.
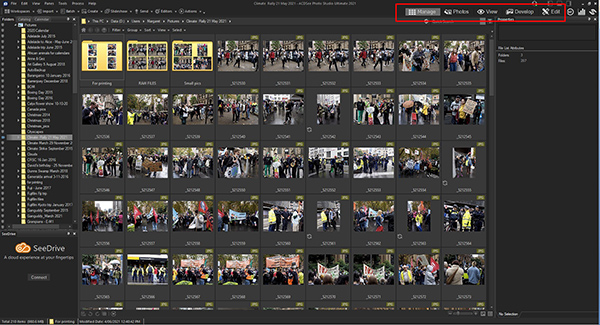
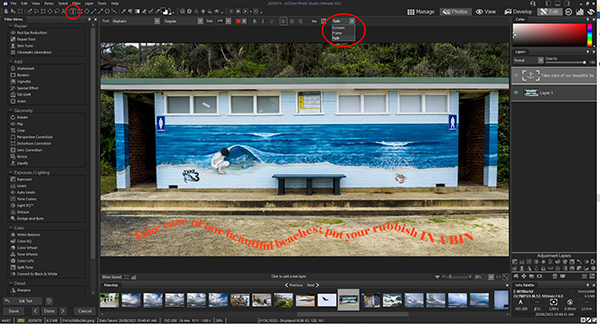
The five mode tabs in the default workspace.
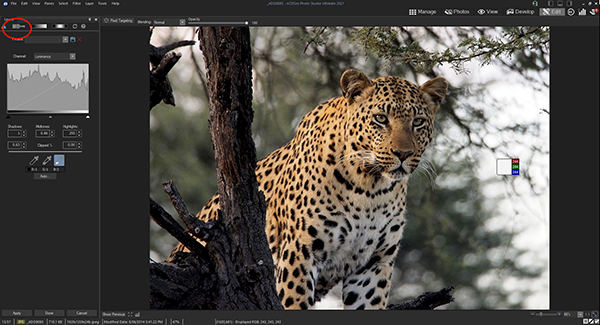
Interestingly, the workspace in Photo Studio Ultimate 2021 only provides five mode tabs instead of the seven in the previous version. The Manage, Photos, View, Develop and Edit remain but the 365 mode and Dashboard mode are now accessed via icons on the top panel. As before, the Manage mode lets you import, browse, preview, locate, compare and sort your files and folders and access the relevant organisation and sharing tools. The Photos tab takes you to your image catalogue (shown below) which is arranged with the oldest files and folders first by default. Right-clicking on a thumbnail displays a list of functions that can be used with that file. This provides an easy way to access the Editing pane.
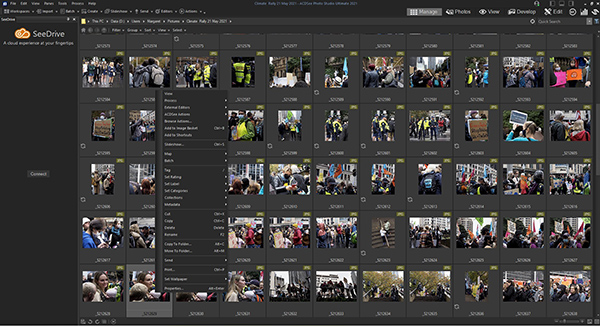
The Photos tab display showing the functions sub-menu that can be displayed by right-clicking on a thumbnail.
The Develop mode launches a set of non-destructive ‘tuning’ adjustments with a workspace containing an enlarged version of the selected image, a toolbar down its left hand side and a filmstrip showing other files in the folder along the bottom of the pane. Users can take Develop Snapshots that save their work during the ‘develop’ process and access them from other tabs.
The Edit mode provides access to the conventional pixel-based editing tools plus a range of other adjustments, including Layers, Filters and a History of the adjustments carried out on the selected image. At the end of an editing session, several options are available for saving the image, depending on how it is to be used.
What’s New
The Colour EQ function and colour balance have been combined under a single Colour EQ sub-menu, which is circled in red in the screen grab below. The secondary menu in this mode splits the sliders between selective and global adjustments, with a new Colour Shift slider added to the global adjustments for changing the hue without affecting the brightness of individual pixels, to accommodate for inherent discrepancies in brightness between different hues.
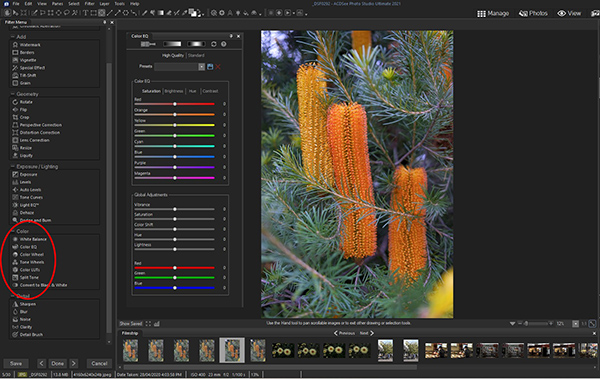
The new Colour sub-menu, circled in red on the above screen grab, contains all the editing colour adjustments. The secondary menu of Colour EQ adjustments is reproduced to the left of the image in the editing window.
A new user interface has been introduced for the Colour Picker, making it easier to achieve accurate colour selections. Mousing over the image displays the RGB Colour Picker, which changes as it encounters different hues.
While the tool itself isn’t new, including it in the adjustments layers and filters is. When activated in the adjustments panel to the right of the editing pane, it can be used to select a colour and adjust its saturation, hue or brightness without affecting other colours in the image.
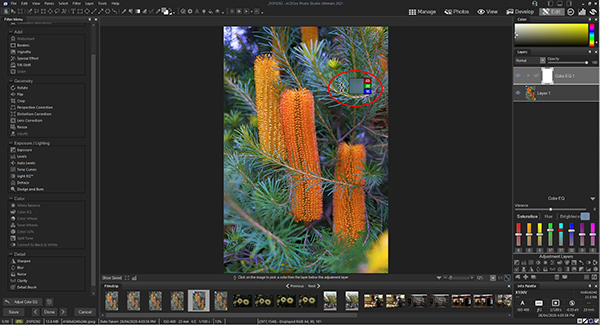
Colour EQ adjustments. Dragging the Colour Picker (circled in red) up the frame increases the saturation of the selected hue, while dragging it down decreases it.
Other adjustment layers that can be modified in this way are the Levels and Gradient Map functions. Pixel targeting is also affected by this tool so the Exposure filter can be used to target a specific tone from five bands, ranging between black and white with three intermediate grey levels, along with eight colour bands.
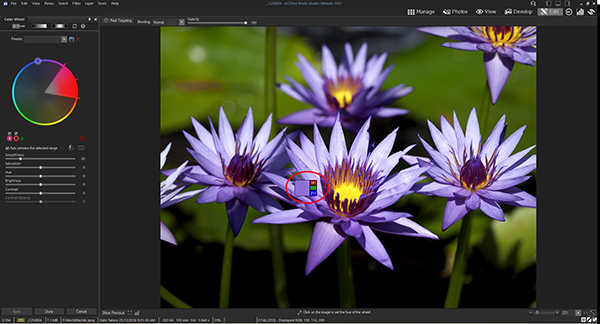
Colour Wheels open in Edit mode and are accessed through the Filter/Colour sub-menu in left side toolbox. This screen grab shows the Colour Wheel, with the RGB Colour Picker circled in red.
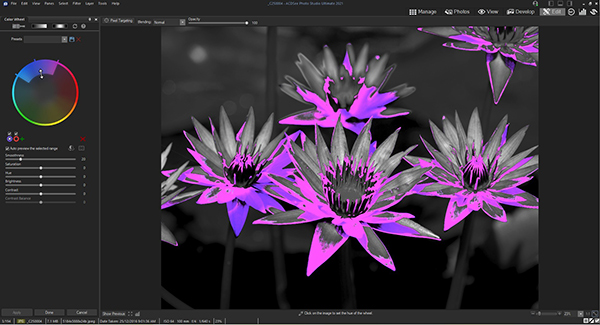
The image swaps to greyscale momentarily for hues outside the range selected on the Colour Wheel. Moving the centre point of the selection out towards the perimeter restricts the selected range to more saturated hues.
Each colour wheel contains a segment that shows the range of hues being worked on; moving its radius markers adjusts the breadth of the range. The selected colour range can be widened or narrowed by dragging the edges of the range selection on the colour wheel towards or away from each other.
As the centre marker on the periphery is dragged around the colour wheel the range of hues changes. The screen switches briefly to greyscale, allowing users to see which parts of the image fit within the selected hue range and providing a quick way of refining the range of hues selected.
Pulling the centre of the colour wheel range out towards the circumference shows which of the colours are highly saturated (lower-saturated colours will revert to greyscale as the circumference of the wheel approaches). Pulling the circumference towards the centre of the wheel displays less saturated hues.
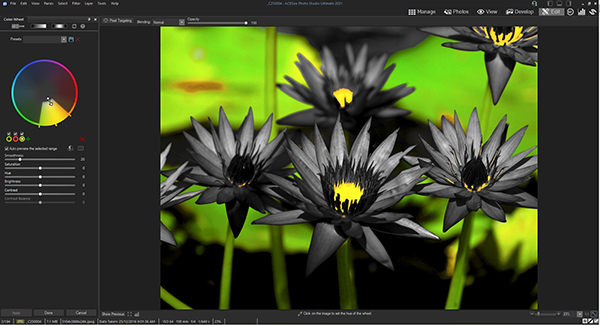
Rotating the selection changes the range of hues affected by the adjustments.
Once the colour range has been selected, adjustments can be made to those specific colours by using the sliders below the wheel. Users can also change the hue by moving the Hue slider. Selections can be inverted (to adjust everything but the selected colour range) by clicking on the Invert button.
Up to 10 additional colour wheels can be added by clicking on the Plus button above the sliders. A coloured circle around the icon indicates the colour range selected for each wheel. Selected colour wheels can also be hidden by un-clicking the check box above them or deleted by clicking on the red X above the sliders.
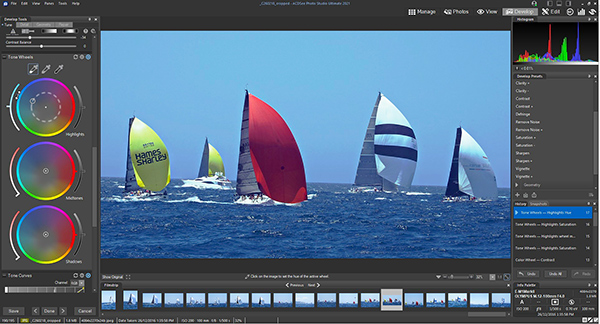
Tone Wheels allow highlights, midtones and shadows to be adjusted separately.
Tone Wheels provide a more refined set of adjustments. Each wheel represents a tonal spectrum, with the default being Highlights, Midtones and Shadows. The Colour Picker can be used to set starting points for each tone wheel and like Colour Wheels, the Tone Wheels can be used with Pixel Targeting.
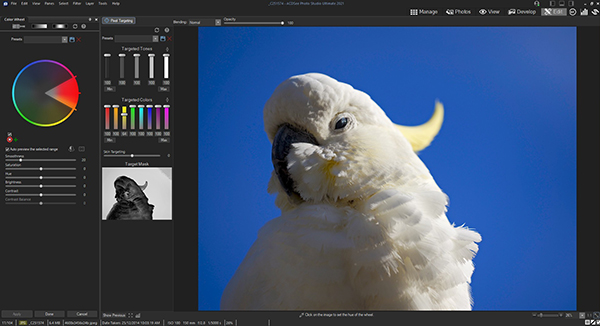
Using Pixel Targeting to select a specified range of hues and tones.
Pixel Targeting allows users to target distinct tones and colours for adjustments and provides a separate slider for selecting skin tones. The selection panel has four sections: Targeted Tones, Targeted Colours, Skin Targeting and the Target Mask.
The latter shows the areas in the image that have been targeted by displaying them in lighter tones. When no pixels are targeted, the Target Mask is completely black; if all are targeted it will be completely white.
The Edit Brush button is circled in red at the centre of the top editing panel toolbar.
The Edit Brush button lets users edit a discrete part of the image by simply brushing on the selected adjustment. Brush widths, feathering and pressure are adjustable and users can specify whether the brushed areas will be removed from the image, inverted or applied. When applied, a brush will affect all active colour wheels.
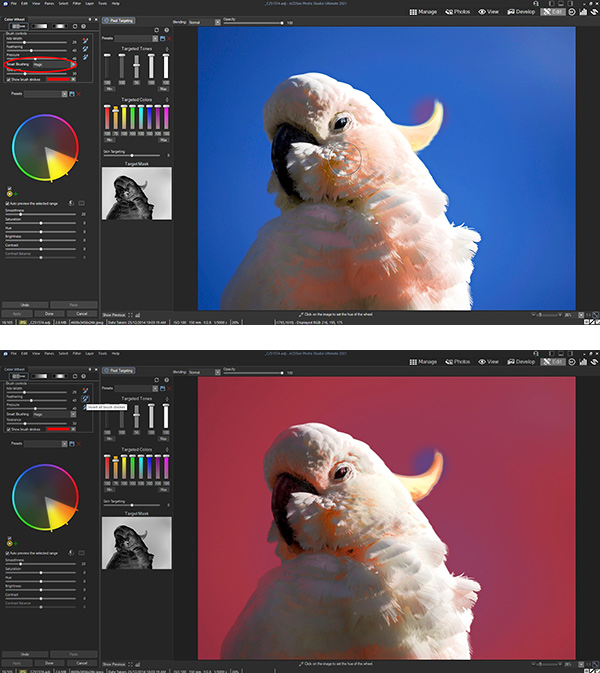
Using the Smart Brush. The lower screen grab shows the effect of clicking on the Invert icon in the dialog box.
The Smart Brush only affects pixels similar in value to the pixel in the centre of the brush stroke. Users can choose between Colour, Brightness and Magic settings. The Colour and Brightness adjustments are self-explanatory, while the Magic brush uses a combination of the colour and brightness values similar to the relevant pixel to determine which pixels should be brushed on, with the strength of the adjustment depending on the Tolerance slider setting.
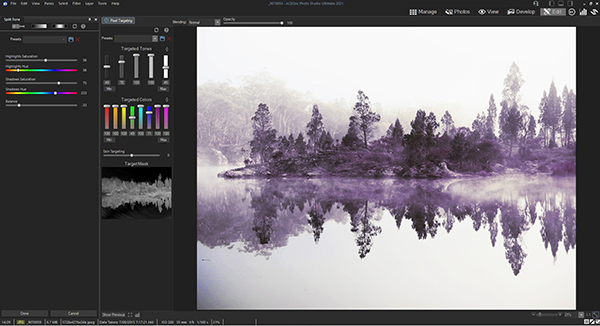
Split Toning.
Pixel targeting can also be used for split toning, which applies different Hue and Saturation adjustments to highlights and shadows in an image. This function is available in the Edit toolbar. Separate sliders are provided for adjusting the hue and saturation for the Highlights and Shadows and a Balance slider is provided for changing the balance between them.
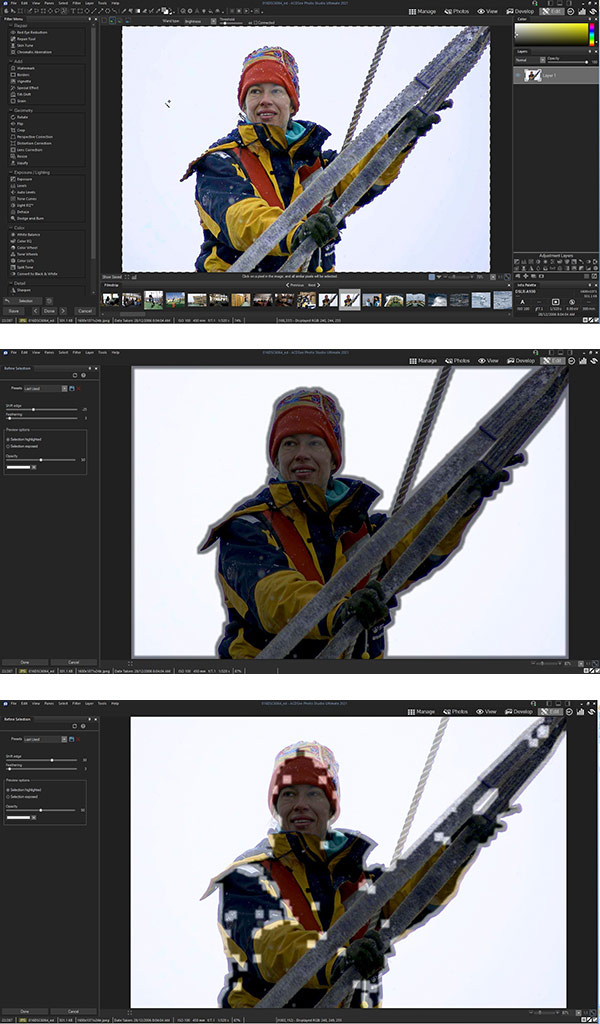
Using the Refine Selection tools.
Refinements to the selection tools allow users to shift or soften the edges of selections to make editing easier. Once a selection has been made, the user clicks on Select > Refine and then uses the Shift Edge slider to bring the edge in by sliding left, or move it out by sliding right, as shown in the screen grabs above (which show extreme adjustments). The Feathering slider softens the edges of the selection to provide a smoother transition.
Text on a path and text in a frame are new features in the latest edition of ACDSee Photo Studio. This feature has been provided in various ways in different applications but it’s nice to see it added to the ACDSee application. The function is selected in Edit mode by clicking on the Text icon in the top toolbar (circled in red) and selecting Path from the dropdown menu in the bar below (circled in red).
Customisation options for the Text-on-a-Path function.
Users can customise the text by selecting font type, size and colour and write on a curve or follow a shape. It’s a useful addition for users who want to produce documents such as announcements and advertisements as well as inserts containing images and graphics.

The batch renaming and resizing panes offer a wide range of options for each mode.
The Batch Renaming and Batch Resizing functions have been improved in response to customer feedback, enabling users to rename or resize multiple images with a single action. These facilities come in addition to the existing batch processing tools, which include batch editing (covering functions like cropping, rotating and correcting colour casts), exporting multiple files to specified folders, file names, formats and dimensions and batch file processing. The specified action is applied to tagged files within a folder or collection.
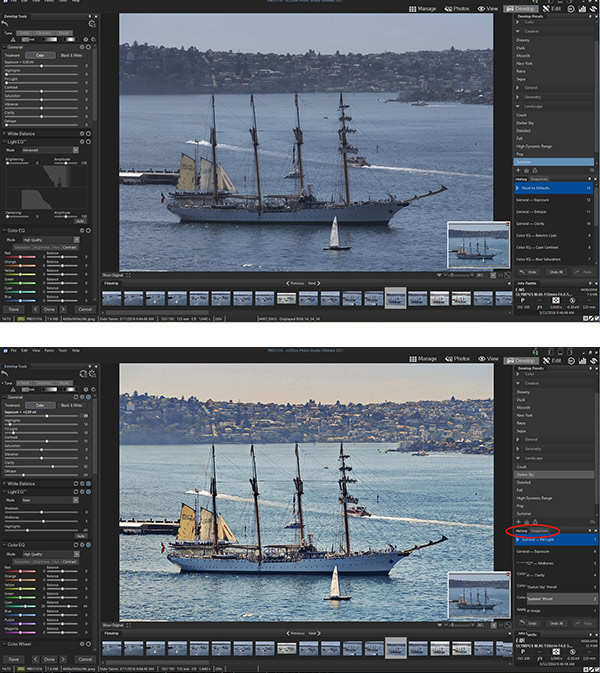
The new Develop Mode user interface with the History tab circled in red.
The Develop mode has been updated with a new interface and panes to streamline processes like applying Presets, taking Snapshots and viewing the Histogram and Develop History. These changes enable users to review previous steps and make changes without having to save the image until they are happy with the result. They can also create and categorise a library of presets for use in future editing sessions.
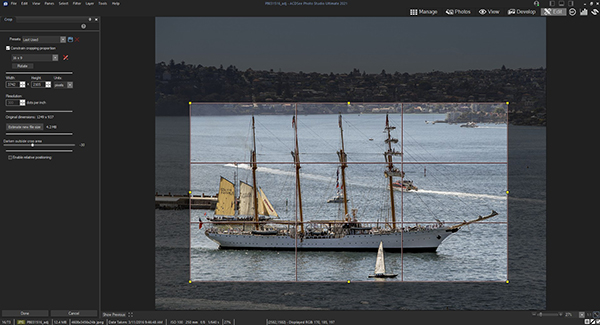
The cropping tool.
The cropping tool gains new relative positioning functionality that allows users to crop multiple images similarly in seconds. New toggle options for Quick Search makes finding images in large databases faster, while pressing F1 while performing any function in ACDSee takes the user to the relevant online help page.
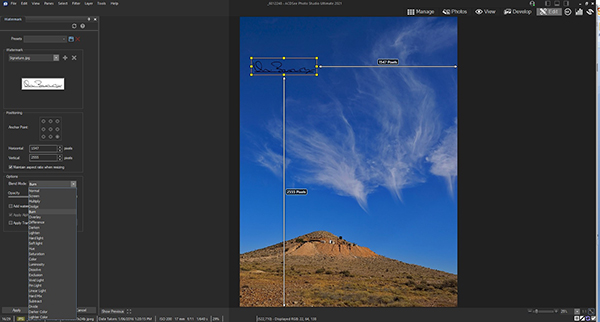
Watermarking an image.
The Watermark tool can be used to add a watermark to a photo. Users can move the watermark anywhere in the image, change its opacity and blend the watermark into the image. The watermark and its position (which is recorded when the watermark is saved) can be stored for subsequent use on other photos or batches of images, using the Batch Edit Watermark function.
Finally, users can also import facial data from Lightroom and Picasa and use the Facial Recognition function to find matching faces in your ACDSee database.
Conclusion
Expect to spend a lot of time coming to grips with the ins and outs of this complex – and comprehensive – application. However, if you’re prepared to spend the necessary time mastering its complexities – and if you want an all-in-one application that can be used for an entire imaging workflow, ACDSee Photo Studio Ultimate 2021 is certainly worth considering, which is why we’ve recommended it.
It’s more affordable than Adobe Photoshop and available as a once-only purchase for as well as monthly or yearly subscription licences. The monthly fee of US$8.90 (AU$12.12) is a bit lower than the monthly fee of US$9.99 (AU$14.29) that Adobe charges for the Photoshop/Lightroom bundle – although not by a substantial amount. However, you can’t buy a ‘lifetime licence’ for Photoshop any more, which makes the ACDSee software at US$149.99 (AU$205, approximately) worth considering if that’s what you’re after.
For those who don’t mind complexity, don’t require a lot of help and want a powerful, low-cost image editor, the freeware application GIMP is worth a look. It’s also usable on a wider range of operating systems, including GNU/Linux, OS X (10.6 and newer), Windows, Sun OpenSolaris and FreeBSD – but not Android or iOS.
Photographers who have already ‘cut their teeth’ on Photoshop will likely find the new ACDSee application frustrating. Those unfamiliar with Photoshop should have fewer problems and the new software provides plenty of assistance through online tutorials and instant access to help on specific functions directly from the relevant pane in the software.
For those who like the security of online storage and want the advantages of a web-based community, subscribing to Photo Studio Ultimate 2021 through the ACDSee website is probably worthwhile. Subscriptions provide users with regular updates and upgrades of the product. Those looking for a simpler, editing-only application would probably be better off with ACD Systems’ new Gemstone application once it’s been released – see beta review here.
SPECS
Builds: 14.0.1.2451 (64-bit); RAW Update 1.4.15.47
Hardware: Intel or AMD processor with 64-bit support
Systems compatibility: Microsoft Windows 7 (SP1), Windows 8, Windows 8.1, & Windows 10 (64-bit editions only)
Display support: 1024 x 768 display resolution (1920 x 1080 recommended); DirectX 10 compatible graphics adapter
Disk space requirement: 2 GB of available hard disk space
Minimum RAM: 4 GB RAM (8 GB RAM or more recommended); 512 MB Video RAM (VRAM)
Supported image formats: Read: ABR, ACDC, AFPHOTO, ANI, DCX, EMF, GIF, ICO, JPG, JP2/JPC, JPG, PBR, PCX, PCT, PNG, PSD, TGA, TIFF, WBMP, WEBP, WMF; Write: ACDC, BMP, GIF, JP2, JPG, PCX, PNG, PSD, WBMP, WEBP, TGA, TIFF
Raw formats supported: ARW, CR2, CR3, cRAW (Sony), CRW (Canon). DCR, DNG, ERF (Epson), GoPro RAW, HDR, HEIF (EXIF support only), MRW, NEF, ORF, PEF, RAF, RAW, RWL, sRAW, SRW
Computer interface: Internet connection and registration are necessary to download 237MB file and for software activation and access to online services
Batch processing: Yes, for editing, resizing, renaming and exporting
Export to social media: Yes via email, Flickr, SmugMug, Zenfolio and other FTP sites
Mobile device support: Limited; requires ACDSee Mobile Sync app
Distributor: ACD Systems International Inc.
Rating
RRP: US$149.99 for Lifetime Licence; US$8.90 / month or $89 / year subscription plans
- Features: 9.0
- Ease of Use: 7.8
- Versatility: 8.9